It Just Has To Be Delicious

Jambalaya

Jambalaya is one of those fairly quick one-pot meals which is really good for using up leftovers. It is basically a rice dish with paprika and chorizo, tinned tomatoes, various vegetables and either chicken or prawns or both. The joy of jambalaya is that you can flavour it however you like – if you want it to be a bit warm, add a chilli (or chilli paste) and/or some tabasco. You can also add sun-dried tomatoes,carrot, zucchini, fire roasted red pepper strips or any other pickles that you may have in the fridge.

jamb

This is my standard recipe, but please feel free to adapt it to your taste.
1 large onion, sliced or chopped how you like it
1 red chilli finely sliced
1 cup approx of rice
1 chorizo sliced
4 mushrooms
1 can of chopped tomatoes
1 stock cube (once you have added the tomatoes, you can make up the stock cube or powder in the empty can)
1 tablespoon paprika
half a stick of celery sliced
half a capsicum (any colour) sliced
a few sun dried tomatoes sliced
8 raw tiger prawns chopped or sliced

1. Boil the kettle. Fry the onion, chilli and chorizo slices (in a large high-sided pan or wok) in a little olive oil for a few minutes, add the capsicum and celery plus any other hard veg that you are including.
2. Sprinkle with paprika and stir fry for a few minutes.
3. Add the rice and stir it around for about 30 seconds. Add the tinned tomatoes. Dissolve the stock cube in the empty tomato tin with some boiling water (this will capture any left over tomato juice). When you hold the can, be careful because it may be very hot where it conducts the heat of the water – add the stock to the pan.
4. Stir well – the rice will begin to cook and absorb the liquid. Now add the mushrooms and sun dried tomatoes.
5. It should take approx 12 minutes to cook depending on your rice, taste the rice as you go along to see how it is doing.
6. When the rice is almost done, add the prawns – they should only take a few minutes to turn opaque.
7. Adjust the seasoning with salt and pepper. When you serve it, the rice should be cooked, and there should be a small amount of rich tomato gravy. I like mine sprinkled with deep fried onions (you can buy these ready made from your asian supermarket).

vbs

One of my favourite dishes in Perth’s Viet Hoa is the beef skewers with wine and herbs. It took me a while to find a marinade that recreated them perfectly, but here it is:

Recipe
750g beef fillet
3 cloves garlic crushed
1 stalk lemon grass
1 small red chilli finely chopped
1 teaspoon caster sugar (brown is better)
1 tablespoon fish sauce (get vietnamese nuoc mam if you can)
2 teaspoons rice wine vinegar
1 tablespoon soy sauce
1 teaspoon sesame oil

Put the beef in the freezer while you make the marinade.
You can chop the lemon grass if you like, but I prefer to slice the very end off, so you can see the white middle, and cut long slits down the length of the stalk, but leaving about an inch intact at the top. Then you can bash the bulbous bottom end with a mallet or a flat heavy knife to release the flavour, but the stalk remains in one piece that you can remove it easily at the end of marinading or cooking.
Mix all of the marinade ingredients together in a large bowl.
Slice the beef very thinly and marinate for at least 4 hours, but preferably overnight (cover the bowl with cling film).
Thread the beef onto skewers and cook on a hot barbecue or griddle. If you like you can sprinkle them with sesame seeds before cooking, and serve with coriander leaves.
Enjoy.

I made this dish after being totally inspired by the black bean beef dish served by Peach Garden at Singapore’s Changi airport (terminal 1). This simple dish was possibly the best meal at an airport that I have ever tasted, and I came home ready to make my own version. Sadly Peach Garden is no longer at Changi, but they do have several branches around Singapore.

bbb

I added mushrooms to my version and used both red and green capsicum peppers. It
wasn’t quite as perfect as the Peach Garden version, but it was definitely very very tasty and I will be making it again. The dish is very quick to make once that you have your prep done, so get everything ready first, make sure your rice is nearly ready, and then create your lovely beef dish. I have tried to keep the salt to a minimum because the light soy and the black bean sauce will have salt in them already – but please taste before serving and adjust the seasoning.
This recipe serves two with lots of nice sauce:

Approx 250 – 300g of good rump steak trimmed and cut into thin strips (I bought a 350g pack, but trimmed all of the fat off)
Half a tablespoon of cornflour
1 tablespoon of shao xing rice wine (widely available in asian shops, but you can substitute with sherry)
1 tablespoon of light soy sauce
Half a large red capsicum
Half a large green capsicum
One medium onion
2-3 large brown mushrooms
2 garlic cloves
4 cm root ginger grated
4 tablespoons black bean sauce
2 teaspoons sugar (preferably brown)
80mls chicken stock (try to use low salt variety)
Half a teaspoon of sesame oil

1. Mix together the cornflour, shao xing rice wine and light soy sauce in a bowl. Marinate the beef in this mixture for at least 10 minutes, but up to half an hour if you are organised.
2. Cut the onion and capsicums into bite sized chunks. Slice the mushrooms.
3. Make the sauce by mixing the stock, sesame oil, black bean sauce and sugar.
4. Fry the beef quickly in a few tablespoons of peanut or sunflower oil to brown it – just a few minutes. Remove the beef and keep it nearby on a plate.
5. Now put the onion, garlic, and ginger in the pan and stir fry for a few minutes. Add the capsisums and mushrooms and continue to stir fry over a fairly high heat for another 4-5 minutes.
6. Now add the sauce and the beef to the pan and stir fry for a further 3 minutes to heat through. Season to taste.
7. Serve with boiled or fried rice. You can garnish the beef with sliced spring onions if you like.

katsu

This delicious curry is relatively simple to make and is best made fresh – there’s nothing quite like freshly fried katsu chicken. If you want to be healthier, you can cook the chicken in the oven. The sauce comes in ready made roux blocks called Golden Curry and they have different strengths – this makes it really simple, but you can also make your own curry roux, so I am going to include the recipe for that too. To serve 2, one large chicken breast should suffice, but feel free to use as much or as little of the ingredients as you wish – these are the approximate quantities that I use.

Ingredients:
1 large chicken breast
Half an onion, chopped into large pieces
1 medium carrot sliced or large diced
1 medium potato large diced
Half a cup of frozen or fresh peas
Panko breadcrumbs
4 tablespoons of flour (any kind, but I use plain most often – you can also use almond flour)
1 egg, beaten
Half a teaspoon of chilli powder
Golden Curry Roux blocks (approx 20g per serving)
Vegetable oil (enough to fill your frying vessel to a depth of at least 2.5cm)

To make the katsu chicken:
1. Heat the oil in a suitable pan for frying – I tend to use a deep wide pan. It will be ready when you place a wooden spoon in the oil and small bubbles rise quickly from the spoon’s surface.
2. Put the flour, egg and panko breadcrumbs into 3 separate large bowls. Season the flour with salt and pepper, (and chilli powder if you feel so inclined).
3. Trim and wash the chicken breast. Pat dry. Place the chicken breast between two sheets of baking parchment and bash it with a rolling pin until it is flatter and thinner.
4. Cut the chicken into 2 or 4 equal size pieces (depending on how you think it will fit into your pan.
5. Coat the chicken pieces in the flour, shake off the excess, dip in the egg, then coat in panko breadcrumbs, pressing the breadcrumbs onto each piece.
6. Fry the pieces in the oil for approx 10 minutes, depending on size, thickness etc. Check that they are cooked by cutting into a thicker part of the meat and checking for pinkness.
7. When you are happy with the doneness, put them on some kitchen paper to absorb the excess oil.
8. You can also cook the chicken in the oven – approx 180 deg C for approx 20-30 minutes – again, check them regularly as the time will depend on the size of the pieces.
9. While the chicken is cooking, put the onion, carrot, potato and peas in a saucepan and cover them with just enough water. Simmer them until they are cooked.
10. Add the curry roux blocks to the vegetables and stir until dissolved. If the sauce is too thick, add some more water and keep stirring.
11. Slice the katsu chicken and serve with the vegetable curry sauce and some boiled rice.

katsu 2

If you prefer to make your own curry sauce, do this:
Finely chop or whizz up half an onion, 2 cloves of garlic and a small (half cm) slice of ginger in a food processor. Cook in a little oil until fragrant.
Mix half a tablespoon of your favourite curry powder with one and a half tablespoons of flour. Stir this in and then slowly add equal quantities of vegetable stock and apple juice until it is a nice thick saucy consistency. Stir well to combine. Stir in half a tablespoon of garam masala. Taste to check the flavour.
If you don’t have apple juice you can whizz up a fresh apple and add this instead, but you will need to keep tasting to get the sweet/savoury balance right.
Now when you simmer the vegetables, drain the water off after cooking and add them to the sauce – you get the same result but all totally homemade.

Raspberries and white chocolate make a great combination, and a loaf cake is easy to prepare and slice. This lovely light and slightly gooey cake is a sweet summer treat.
I have suggested a few things to reduce the dairy, but you really can’t remove it completely unless you use dark chocolate instead (which works equally well with raspberries).

loaf cake

If you are going for the reduced dairy version, first make your own buttermilk by adding a tablespoon of lemon juice to three quarters of a cup of your favourite non-dairy milk e.g. almond milk, soy milk, coconut milk. Leave it for ten minutes until it curdles.

Line a loaf tin with baking parchment and set the oven to 180 deg C.

Take a punnet of raspberries (1 cup approx). Wash and pat them dry and dust them lightly with some flour.

Take approx 75g of fine white chocolate and break it into small pieces – they don’t have to be uniform in size, just smallish pieces about the same size as choc chips that you would get in a choc chip cookie.

Put the curdled ‘buttermilk’ in a large mixing bowl and add:
125 ml vegetable oil
2 eggs
1 teaspoon of vanilla
Whisk them all together with an electric whisk for a few minutes.

In another bowl combine:
One and a half cups of flour
three quarters of a cup of caster sugar
1 heaped teaspoon of baking powder
Half a teaspoon of salt

Fold the dry ingredients into the whisked wet ingredients.
Fold in the raspberries and white chocolate pieces. Pour the mixture into the lined loaf tin and tap the tin on the kitchen worktop to ensure that the mixture gets into the corners of the tin.
Bake for just longer than an hour until a skewer comes out mostly clean (there will be some gooey choc on the skewer).

loaf 2

Cool the cake by lifting it out of the tin. Once almost cool, melt approx 100g white chocolate in a double boiler (a bowl that fits tightly over a saucepan, with some water in the saucepan will work nicely too. Just make sure that the water does not touch the bottom of the bowl.)
Drizzle the melted chocolate over the top of the cake. Done !

tart

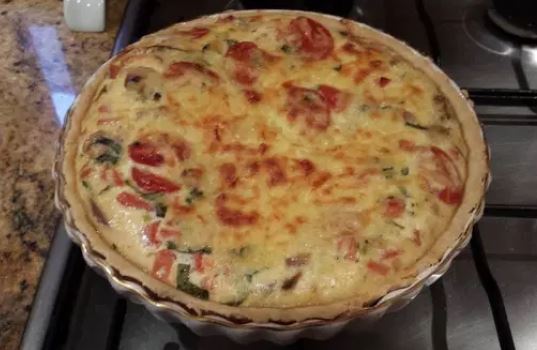
I wanted to make a tart for our special lunch at work, and decided to make
something vegetarian so that everybody could have a taste. I made the pastry the day before and lined the pie dish with it. I then kept the pie dish in the fridge until I needed it.

PASTRY:
250g plain flour
125g butter (or 100g dairy free spread), diced
1 egg
pinch of salt

1. Mix the flour, salt and butter in a food processor until the mixture resembles fine breadcrumbs.
2. Transfer to a large bowl and add the egg. Mix well with a spatula.
3. Add splashes of cold water until it binds together to form a nice round of dough.
4. Making sure that your hands are cold, pat the dough together and roll out on a floured surface. Line a pastry dish with the dough and hook it over the edge of the dish slightly (this will stop it from shrinking down in the oven). Wrap the whole dish in foil and store in the fridge until needed.
On the day that you are cooking the tart, bake the pastry case blind (use ceramic beads) for approx 10 – 15 minutes at 180 deg C. Once baked blind, gently press a rolling pin on the top edge to remove the excess pastry that was hooked over the sides.

FILLING:
You can use your imagination with the filling and include any veggies that you like, but I chose onion, mushroom and tomatoes.
ONIONS – Slice 1 large or 2 small onions (I used red onions), and fry them in a little olive oil. As they soften add a sprinkle of salt, a dash of balsamic vinegar (optional) and a little sugar (optional) to help them caramelise.
MUSHROOMS – Slice the mushrooms and cook them in a saucepan with a little salt and pepper and a teaspoon of dairy free spread or butter until they are just soft.
TOMATOES – I used cherry tomatoes halved and I cooked them – cut side down – in the onion pan just to concentrate some of the liquid in them. You can also add some chopped sun dried tomatoes to the tart. I seasoned them lightly with salt and pepper.
BASIL – tear or thinly slice some fresh basil leaves
SAUCE – 3 eggs whisked up with 280mls milk and some grated cheddar – I don’t know how much I used but it was probably enough to cover the surface of the tart. I mixed some cheese with the sauce and saved some to sprinkle on top.
Now arrange the onions, mushrooms and tomatoes in the tart, add some chopped basil, and pour the sauce over to fill the tart to the brim, Sprinkle a little cheese on top and bake in a preheated oven at 180-200 deg C for approx 25-30 minutes until the filling is set and golden.
Serve warm or chilled.

Granola

granola

Do you know exactly what goes into your breakfast cereal ? The regular supermarket cereals tend to be full of sugar and additives, and the more sophisticated cereals are expensive for what you get.
Making your own granola is easy and cheaper. You get exactly what you want and it tastes great with yoghurt and berries on top. It’s portable – you can put some granola, yoghurt and berries in a jar and take them into work for an easy desk breakfast. I have a long journey so I pop some frozen berries on top (cherries, blueberries) and by the time I get to work the berries have thawed.

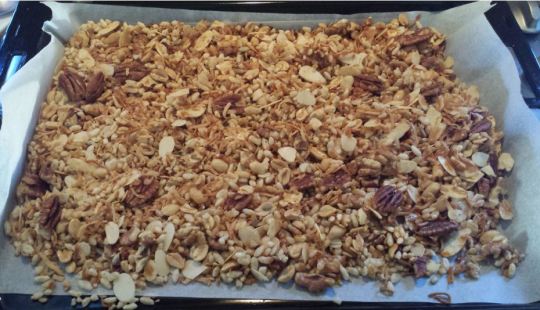
Start by lining an oven tray with baking parchment and set your oven to approx 150 deg C.

Now the fun bit – you can make it up as you go along. If you are allergic to nuts, leave the nuts out, if you are allergic to oats, leave the oats out. Choose from any of the following, but don’t add any chocolate chips or dried fruit at this stage because they will melt and burn.

You just need nuts seeds and grains at this time. Generally, oats form the major part of the base, but if you are allergic to oats try something different like plain puffed rice. Grab a large bowl and get mixing – I generally use the following:
Porridge oats (steel cut) 1-2 cups
Puffed rice with no added sugar 1-2 cups
As much as you fancy of:
sunflower seeds
pumpkin seeds (pepitas)
pine nuts
chia seeds
flax seeds
sliced almonds
shredded coconut
peanuts
walnuts
pistachios
hazelnuts
pecans
This is just a guide – you can use any nuts and seeds that you like

Stir through some coconut oil and honey (approx 4 tablespoons)
Spread it all out on the baking parchment – the thinner the layer, the quicker it will toast – and stir through every ten minutes. It should take about 30 minutes to toast nicely, and it will be a lovely golden colour. Leave to cool.
Now you can transfer it to a plastic cereal container but beforehand you can stir through any of the following, or you can add them each time you get your breakfast ready depending on how you feel.
Chop them or leave them whole :
plump dried apricots
prunes
dried peel
sultanas
craisins
cranberries
dried banana chips
dried figs
dark chocolate nibs
When you serve your granola, use a luscious thick greek style yoghurt like Gippsland (greek yoghurt has good protein content) or alternatively use ricotta cheese, marscapone, or soy/coconut yoghurt.
Top with fruit compote (really easy to make with frozen berries – just put some in a saucepan with a splash of water and a spoon of honey or sugar and heat gently for 5minutes), or use tinned fruits, or fresh fruits like pineapple, peaches, strawberries and banana. A yummy good quality breakfast.

gran 2

gcc 1

This recipe is based on my peanut butter and chocolate chip cookies, they really are simple to make and taste very good. The ginger chunks add a nice dimension and they are based on my memories of M&S extremely chocolatey biscuits. You just need a food mixer, a hand held one is fine, and the ingredients are really straightforward.

Start off by lining a few baking trays with baking parchment – you will need 2 large or 3 small baking trays.

Set the oven to 190 deg C.

Ingredients
180g plain flour
half a teaspoon of baking powder
a pinch of salt
150g butter or dairy free spread e.g. Nuttelex
60g soft brown sugar (you can also use caster but brown sugar adds gooeyness)
1 teaspoon of vanilla essence
1 large egg
125g of chopped crystallised ginger (or the uncrystallised naked ginger works well) I use Buderim ginger, but please don’t use raw ginger – it’s not the same!
Optional: you can also include a handful of chocolate chips to the dry mix and a scoop of Nutella or peanut butter to the wet mix if you want an extra richness

For the coating – approx 200g chocolate of your choice – I like dark 70-80% cocoa

Method
1. Mix the dry ingredients together in a bowl – flour, baking soda and salt. Add the ginger chunks (and choc chips if using them). Stir well.
2. Beat the sugar and butter together using the food mixer. If including a scoop of peanut butter or Nutella, wait until it is nicely combined and fluffy then add the Nutella/peanut butter and whisk again.
3. Now beat in the egg and vanilla, it may curdle a little but don’t worry the flour will sort that out.
4. Now mix in the dry ingredients and beat again – the dough should stiffen up quite a bit and you may need to add a little water to soften it, but don’t add too much because it needs to hold together on the baking tray. It should be a kind of plasticine consistency so that you can shape it into balls.
5. Now take a dessert spoon of mixture and roll it into a ball. If it sticks to your hands, just wet your hands a little. Put all of the balls on the baking trays to make sure that they are roughly equal in size, then press them either with fingers or the base of a glass, squashing them into round biscuit shapes. Keep a few centimetres distance between each biscuit because they will spread out. You should get around 12-14 cookies.
6. Bake for approx 12-15 minutes until they are slightly golden and still a little soft in the middle.
7. Once they are cool, melt the chocolate over a double boiler (or in a bowl over a saucepan of gently simmering water – if you do this the bowl must fit tightly and not touch the water).
8. Either pour some of the melted chocolate over the biscuits or dip them half into the molten chocolate, then place on baking parchment to set. Put them in the fridge to speed up the setting. Don’t forget to taste one just to check they are ready.

pcc

These cookies are so simple to make and taste really good. You just need a food mixer, a hand held one is fine, and the ingredients are really straightforward.
Start off by lining a few baking trays with baking parchment – you will need 2 large or 3 small baking trays.

Set the oven to 190 deg C.
Ingredients
180g plain flour
half a teaspoon of baking powder
a pinch of salt
125g butter or dairy free spread e.g. Nuttelex
60g soft brown sugar
125g smooth peanut butter
1 teaspoon of vanilla essence
1 large egg
125g of dark chocolate either use chips or block chocolate broken into small pieces

Method
1. Mix the dry ingredients together in a bowl – flour, baking soda and salt.
2. Beat the sugar and butter together using the food mixer, once it is nicely combined and fluffy add the peanut butter and whisk again.
3. Now beat in the egg and vanilla, it may curdle a little but don’t worry the flour will sort that out.
4. Now mix in the dry ingredients and beat again – the dough should stiffen up quite a bit and you may need to add a little water to soften it, but don’t add too much because it needs to hold together on the baking tray.
5. Lastly stir in the chocolate chips.
6. Now take a dessert spoon of mixture and press it onto the baking tray in a roundish shape. Continue until all of the mixture is used up. Keep a few centimetres distance between each biscuit because they will spread out.
7. Bake for approx 12 minutes until they are slightly golden and still a little soft in the middle. It is important to taste one just to check.
8. Yum, now get the kettle on – there’s nothing like freshly baked biscuits with a cuppa.

Huevos Rancheros

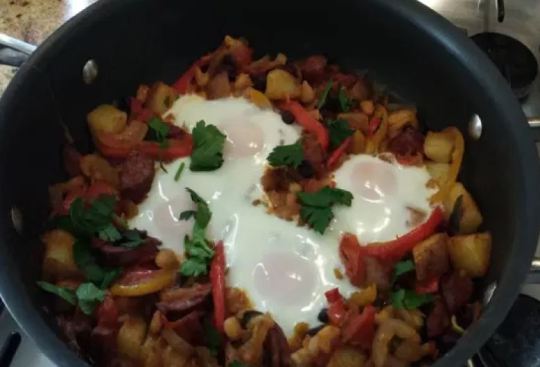
This is my recipe for huevos rancheros. I am not sure if it is totally authentic, but it is very tasty and works well as breakfast, brunch or supper.

huevos

This is a recipe that can be adapted to be suitable for vegetarians.
If you are vegetarian, leave the chorizos out, and if you are vegan leave the eggs out.

Ingredients:
4 fresh eggs
1 – 2 chorizos sliced or diced
2 medium potatoes
1 – 2 onions sliced
1 -2 fresh chillies sliced (any variety depending on how hot you like them)
2 cloves of garlic chopped finely or crushed
2 capsicums, one red, one yellow sliced
2 fresh ripe tomatoes chopped (Roma are good)
1 tin of mixed beans, drained (pinto beans and black beans are traditional but you can use any bean mixture)
1 tin of diced or crushed tomatoes
Thyme – fresh or concentrate
Flat leaf parsley
Smoked paprika
Salt and pepper

Method:
1. Wash the outside of the potatoes and dice them (leave the skin on – it is full of goodness and life is too short to peel potatoes). Boil them in salted water for about 10 minutes until they are soft but still holding their shape. This can be done a day in advance and if you like a crispier texture, the potatoes can then be fried or oven baked to add a bit of crunch, however, if you don’t have time the recipe still works with just boiled diced potatoes.
2. Choose a pan that is suitable for the hob and the grill (one with a handle that won’t melt) and put a little olive oil in the pan.
3. If using chorizos, put them in first to render the fat from them and add flavour to the oil. Fry them for a few minutes.
4. Add the garlic, onion, chilli, potatoes, capsicums, approx. 1 teaspoon of smoked paprika and 2 tablespoons of thyme and fry for approx. 5 minutes until the onion and capsicums have softened.
5. Add the beans and the tinned and fresh tomatoes and stir well, cook for a further 2 – 3 minutes. Turn the grill on.
6. Taste the mixture and add salt and pepper to your taste. Stir in some chopped flat leaf parsley.
7. Now make 4 wells in the mixture and break an egg in to each well. Cook for another minute on the hob and then transfer to the grill to finish off the eggs. I like my eggs to be slightly wobbly and dippy, but if you prefer your eggs well done, cook them for longer. Garnish with a little parsley.
8. Traditionally this is served on corn tortillas, but I like to serve it with crusty bread to mop up all of the sauce.