It Just Has To Be Delicious

Archive for the ‘Recipe’ Category

Granola

granola

Do you know exactly what goes into your breakfast cereal ? The regular supermarket cereals tend to be full of sugar and additives, and the more sophisticated cereals are expensive for what you get.
Making your own granola is easy and cheaper. You get exactly what you want and it tastes great with yoghurt and berries on top. It’s portable – you can put some granola, yoghurt and berries in a jar and take them into work for an easy desk breakfast. I have a long journey so I pop some frozen berries on top (cherries, blueberries) and by the time I get to work the berries have thawed.

Start by lining an oven tray with baking parchment and set your oven to approx 150 deg C.

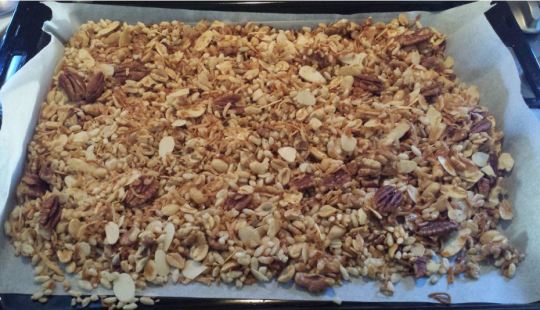
Now the fun bit – you can make it up as you go along. If you are allergic to nuts, leave the nuts out, if you are allergic to oats, leave the oats out. Choose from any of the following, but don’t add any chocolate chips or dried fruit at this stage because they will melt and burn.

You just need nuts seeds and grains at this time. Generally, oats form the major part of the base, but if you are allergic to oats try something different like plain puffed rice. Grab a large bowl and get mixing – I generally use the following:
Porridge oats (steel cut) 1-2 cups
Puffed rice with no added sugar 1-2 cups
As much as you fancy of:
sunflower seeds
pumpkin seeds (pepitas)
pine nuts
chia seeds
flax seeds
sliced almonds
shredded coconut
peanuts
walnuts
pistachios
hazelnuts
pecans
This is just a guide – you can use any nuts and seeds that you like

Stir through some coconut oil and honey (approx 4 tablespoons)
Spread it all out on the baking parchment – the thinner the layer, the quicker it will toast – and stir through every ten minutes. It should take about 30 minutes to toast nicely, and it will be a lovely golden colour. Leave to cool.
Now you can transfer it to a plastic cereal container but beforehand you can stir through any of the following, or you can add them each time you get your breakfast ready depending on how you feel.
Chop them or leave them whole :
plump dried apricots
prunes
dried peel
sultanas
craisins
cranberries
dried banana chips
dried figs
dark chocolate nibs
When you serve your granola, use a luscious thick greek style yoghurt like Gippsland (greek yoghurt has good protein content) or alternatively use ricotta cheese, marscapone, or soy/coconut yoghurt.
Top with fruit compote (really easy to make with frozen berries – just put some in a saucepan with a splash of water and a spoon of honey or sugar and heat gently for 5minutes), or use tinned fruits, or fresh fruits like pineapple, peaches, strawberries and banana. A yummy good quality breakfast.

gran 2

Chocolate Ginger Cookies

gcc 1

This recipe is based on my peanut butter and chocolate chip cookies, they really are simple to make and taste very good. The ginger chunks add a nice dimension and they are based on my memories of M&S extremely chocolatey biscuits. You just need a food mixer, a hand held one is fine, and the ingredients are really straightforward.

Start off by lining a few baking trays with baking parchment – you will need 2 large or 3 small baking trays.

Set the oven to 190 deg C.

Ingredients
180g plain flour
half a teaspoon of baking powder
a pinch of salt
150g butter or dairy free spread e.g. Nuttelex
60g soft brown sugar (you can also use caster but brown sugar adds gooeyness)
1 teaspoon of vanilla essence
1 large egg
125g of chopped crystallised ginger (or the uncrystallised naked ginger works well) I use Buderim ginger, but please don’t use raw ginger – it’s not the same!
Optional: you can also include a handful of chocolate chips to the dry mix and a scoop of Nutella or peanut butter to the wet mix if you want an extra richness

For the coating – approx 200g chocolate of your choice – I like dark 70-80% cocoa

Method
1. Mix the dry ingredients together in a bowl – flour, baking soda and salt. Add the ginger chunks (and choc chips if using them). Stir well.
2. Beat the sugar and butter together using the food mixer. If including a scoop of peanut butter or Nutella, wait until it is nicely combined and fluffy then add the Nutella/peanut butter and whisk again.
3. Now beat in the egg and vanilla, it may curdle a little but don’t worry the flour will sort that out.
4. Now mix in the dry ingredients and beat again – the dough should stiffen up quite a bit and you may need to add a little water to soften it, but don’t add too much because it needs to hold together on the baking tray. It should be a kind of plasticine consistency so that you can shape it into balls.
5. Now take a dessert spoon of mixture and roll it into a ball. If it sticks to your hands, just wet your hands a little. Put all of the balls on the baking trays to make sure that they are roughly equal in size, then press them either with fingers or the base of a glass, squashing them into round biscuit shapes. Keep a few centimetres distance between each biscuit because they will spread out. You should get around 12-14 cookies.
6. Bake for approx 12-15 minutes until they are slightly golden and still a little soft in the middle.
7. Once they are cool, melt the chocolate over a double boiler (or in a bowl over a saucepan of gently simmering water – if you do this the bowl must fit tightly and not touch the water).
8. Either pour some of the melted chocolate over the biscuits or dip them half into the molten chocolate, then place on baking parchment to set. Put them in the fridge to speed up the setting. Don’t forget to taste one just to check they are ready.

Peanut Butter and Chocolate Cookies

pcc

These cookies are so simple to make and taste really good. You just need a food mixer, a hand held one is fine, and the ingredients are really straightforward.
Start off by lining a few baking trays with baking parchment – you will need 2 large or 3 small baking trays.

Set the oven to 190 deg C.
Ingredients
180g plain flour
half a teaspoon of baking powder
a pinch of salt
125g butter or dairy free spread e.g. Nuttelex
60g soft brown sugar
125g smooth peanut butter
1 teaspoon of vanilla essence
1 large egg
125g of dark chocolate either use chips or block chocolate broken into small pieces

Method
1. Mix the dry ingredients together in a bowl – flour, baking soda and salt.
2. Beat the sugar and butter together using the food mixer, once it is nicely combined and fluffy add the peanut butter and whisk again.
3. Now beat in the egg and vanilla, it may curdle a little but don’t worry the flour will sort that out.
4. Now mix in the dry ingredients and beat again – the dough should stiffen up quite a bit and you may need to add a little water to soften it, but don’t add too much because it needs to hold together on the baking tray.
5. Lastly stir in the chocolate chips.
6. Now take a dessert spoon of mixture and press it onto the baking tray in a roundish shape. Continue until all of the mixture is used up. Keep a few centimetres distance between each biscuit because they will spread out.
7. Bake for approx 12 minutes until they are slightly golden and still a little soft in the middle. It is important to taste one just to check.
8. Yum, now get the kettle on – there’s nothing like freshly baked biscuits with a cuppa.

Huevos Rancheros

This is my recipe for huevos rancheros. I am not sure if it is totally authentic, but it is very tasty and works well as breakfast, brunch or supper.

huevos

This is a recipe that can be adapted to be suitable for vegetarians.
If you are vegetarian, leave the chorizos out, and if you are vegan leave the eggs out.

Ingredients:
4 fresh eggs
1 – 2 chorizos sliced or diced
2 medium potatoes
1 – 2 onions sliced
1 -2 fresh chillies sliced (any variety depending on how hot you like them)
2 cloves of garlic chopped finely or crushed
2 capsicums, one red, one yellow sliced
2 fresh ripe tomatoes chopped (Roma are good)
1 tin of mixed beans, drained (pinto beans and black beans are traditional but you can use any bean mixture)
1 tin of diced or crushed tomatoes
Thyme – fresh or concentrate
Flat leaf parsley
Smoked paprika
Salt and pepper

Method:
1. Wash the outside of the potatoes and dice them (leave the skin on – it is full of goodness and life is too short to peel potatoes). Boil them in salted water for about 10 minutes until they are soft but still holding their shape. This can be done a day in advance and if you like a crispier texture, the potatoes can then be fried or oven baked to add a bit of crunch, however, if you don’t have time the recipe still works with just boiled diced potatoes.
2. Choose a pan that is suitable for the hob and the grill (one with a handle that won’t melt) and put a little olive oil in the pan.
3. If using chorizos, put them in first to render the fat from them and add flavour to the oil. Fry them for a few minutes.
4. Add the garlic, onion, chilli, potatoes, capsicums, approx. 1 teaspoon of smoked paprika and 2 tablespoons of thyme and fry for approx. 5 minutes until the onion and capsicums have softened.
5. Add the beans and the tinned and fresh tomatoes and stir well, cook for a further 2 – 3 minutes. Turn the grill on.
6. Taste the mixture and add salt and pepper to your taste. Stir in some chopped flat leaf parsley.
7. Now make 4 wells in the mixture and break an egg in to each well. Cook for another minute on the hob and then transfer to the grill to finish off the eggs. I like my eggs to be slightly wobbly and dippy, but if you prefer your eggs well done, cook them for longer. Garnish with a little parsley.
8. Traditionally this is served on corn tortillas, but I like to serve it with crusty bread to mop up all of the sauce.

Gwen McDonald’s Stuffing

stuf

This stuffing is so tasty, it’s like a meal in itself. It’s our much cherished recipe that my mother in law used to make. You can have it the traditional way with roast chicken or turkey, and I can guarantee that it will taste excellent the next day in leftover chicken and stuffing sandwiches. I have a friend who likes to eat it inside yorkshire puddings mixed with chicken and mayo. When you bake it, the receptacle that you bake it in depends on your preference – if you like your stuffing in big meaty slices (meatloaf style), bake it in a 1 or 2 pint pudding dish, if you like your stuffing crispy, lay it out more thinly on a greased flat baking tray, or use something in between the two – your choice. It needs baking for approximately 40 minutes at 170-180 deg C, but if you spread it more thinly it will need less time, maybe 30 minutes. The quantities are very rough too because it is a home grown recipe. You can add extra ingredients if you like, or take away ingredients that you don’t like to suit your taste.

These are the rough quantities that I use:

1 medium onion diced

2 large flat mushrooms chopped into small pieces

3-4 rashers of bacon chopped into small pieces

85g packet of Paxo Sage and Onion stuffing mixed up with water as directed OR 2 slices of bread, a few sage leaves and a few sprigs of thyme

1 packet of 8 pork sausages or the equivalent amount of sausagemeat (I prefer British sausages, so use the ones from the ‘British Sausage Company’ – my English friends can use their favourites such as Walls or Butcher’s Choice)

1. Fry the onion, mushrooms and bacon in a little oil until almost cooked. Cool for 5 minutes.
2. If you haven’t got Paxo ready and made up, whizz up the bread in a food processor to get breadcrumbs, and add some chopped sage and thyme (avoid the thyme stalks, just use the leaves).
3. Place the sausagemeat in a large bowl. If you are using sausages, remove the skins by running a sharp knife along one edge and separating the skin from the meat.
4. Mix all of the other ingredients together with the sausagemeat – use a wooden spoon or your hands to combine everything thoroughly.
5. Butter or lightly grease your receptacle of choice and bake in an oven as directed above.

stuf 2

Terrine

I had a party this weekend and decided to make terrine for the food table. I thought it would be difficult and take ages, but it was surprisingly easy and it turned out really well.

ter 1

I discovered that you can really make it up as you go along, you can use pretty much whichever meats you like, and you can also add herbs that you like. If I were to make this again I might add some vegetables to it for a change of texture.
I made the terrine from the recipe on the BBC Good Food page but adapted it by adding chicken. I found that the quantities were enough to make one full sized terrine and one smaller one. I used standard loaf tins to make it.

Ingredients
300g pork tenderloin
2 medium sized chicken breasts
2 packs of sausages or an equivalent amount of sausagemeat (if using sausages, remove the skins)
a bunch each of thyme, parsley and chives, finely chopped
approx 12 rashers of streaky bacon (or use long cut bacon and save the meaty part for brekkie)
a splash or two of port or brandy
100g pistachios – shelled
a bag of dried apricots (or you could use prunes or sour cherries)

1. Chop the pork tenderloin and chicken into bite sized pieces and soak in the brandy for a while – just use a few tablespoons of brandy and stir it occasionally. Add a little salt but not too much because the bacon and sausages will add salt.
2. Heat the oven to 180 deg C.
3. Lightly butter two standard loaf tins.
4. Line the tins with the streaky bacon, try not to leave any gaps. If found that my rashers were too short to wrap right around the terrine but it still worked out ok.
5. Sprinkle some of the mixed herbs on the bacon, then line the bottom with pork fillet.
6. Sprinkle with more herbs and some pistachios – you can actually use quite a few pistachios, I was a bit sparing with mine.
7. Layer some sausagemeat on top, sprinkle with herbs again, and place a line of apricots down the middle.
8. Now layer with chicken, add more herbs, and finish with another layer of sausagemeat.
9. If there are any ingredients left just tuck them in where you can – you can do another layer of apricots or pistachios if you like.
10. Wrap the bacon over the top of the terrine and squash it down firmly – I covered it with foil and pushed the foil down quite hard with my hands.
11. Wrap the loaf tins in heavy duty foil, use a few layers and wrap them tightly.
12. Half fill a roasting tray with hot water to make a bain marie, and place the loaf tins in the water. Don’t overfill the roasting tin, the water mustn’t get into the terrines. My water level was approx two thirds the height of the tins.
13. Place the roasting tin containing the terrines into the oven and cook for 1 to one and a half hours.
You can test them with a skewer or a meat thermometer to see if they are done.
14. Take the terrines out of the water bath and let them cool completely. While they are cooling place a few large cans on top to weigh down the meat. This will give you a more tightly packed result.
15. Now transfer then to the fridge – still weighed down and leave overnight.
16. My terrines kept ok in the fridge for a few days before serving. When you turn them out, run a knife around the outside of the bacon, tip them over and tap the tin. The surface will be covered in a thin layer of meat jelly which is quite nice.

ter 2

Samosas

I love samosas. This is a vegetarian recipe, but you can add minced lamb to the mixture if you prefer the meat version. I made mine with filo pastry – you can make the traditional samosa pastry if you like, but it is quite an art to get it right, and filo crisps up really well when you fry them. I asked my Indian friend Kesh if it is ok to use filo and he said yes, so if it’s good enough for him then I don’t feel too bad about cheating. Like the onion bhajias, you can fry these in advance and heat them up later in a hot oven.

sam 3

To make the filling you need:
2 onions chopped
4 medium potatoes diced small
2 carrots diced small
2 cups of frozen peas
1 teaspoon of salt
2 teaspoons of green masala paste (if you haven’t got any – whizz up a green chilli with 2 large cloves of garlic and and inch of root ginger)
1 teaspoon of grated fresh ginger
1 and a half teaspoons fresh crushed garlic
2 teaspoons sugar
half a teaspoon turmeric (haldi)
half a tablespoon ground coriander (dhania)
half a tablespoon ground cumin (jeera)
2 tablespoons lemon juice
a large handful of coriander leaves finely chopped

Method
1. Heat 3 tablespoons of sunflower or groundnut oil in a large pan or wok with a lid
2. Add the onions and fry gently for a few minutes, then add the rest of the ingredients and mix well.

sam 4

3. Cover and simmer over a low heat for up to 45 minutes (the cooking time will depend on how large the pieces are).
4. Test regularly with a knife to see if cooked (try a potato).
5. Stir through some butter or non dairy spread while still warm, and then set aside to cool. Next step you need butter or non dairy spread and some cornflour.
6. Melt some butter or non dairy spread to brush on the pastry.
7. Mix 1 teaspoon of cornflour with water to make a runny paste – this can be used to ‘glue’ the filo edges together if the samosas are a bit loose.

Once the filling has cooled, spread out some filo pastry on a work surface.
Take one sheet and brush it with the butter or dairy free spread and place another sheet over the top.
Slice the sheet vertically into approx 5 strips.
At the bottom of a strip place a spoonful of filling. Fold the corner over in a triangle, then back again in a zig zag pattern until the whole strip of pastry has been used. Seal the end with a dab of the cornflour paste.
Click here for a folding diagram.
Carry on until all of the filo and mixture is used up.
Deep fry in hot oil until brown and crispy. Drain on kitchen paper.
If not eating immediately they can be finished in a hot oven for 10 minutes.

Onion Bhajias

These little onion bhajias are magic – I think it’s nice to make them small because they end up crispier and not at all stodgy. If you are not eating them straight away, you can deep fry them in advance, and then finish them off in a hot oven which will crisp them up nicely.

ob 1

What you need depends on how many you are going to make – I managed to get around 25- 30 small ones out of this mixture.
Ingredients
1/2 cup of chick pea flour (chana flour or gram flour)
1 cup of self raising flour
2 onions halved and then sliced finely so that you get long bits which will crisp up
1/4 teaspoon turmeric (haldi)
1 teaspoon salt
1 teaspoon ground cumin (jeera)
1 teaspoon ground coriander (dhania)
1/4 teaspoon crushed star anise (soomph)
1/4 teaspoon chilli powder
1 teaspoon of green masala paste (if you don’t have this whizz up half a green chilli, a large clove of garlic and 1/2″ root ginger)
200ml water

Method
1. Mix all of the dry ingredients together in a bowl, then add the water to make a batter and mix till smooth (you can use a blender if you like), then add the onions and mix well.
2. Heat some oil in a large pan or deep fat fryer – it will be hot enough when a tiny drop of batter fizzes and rises to the surface.
3. Using two spoons press the batter into small balls – it will look like it wants to fall apart, but when you add it to the oil it will bind together and be ok.
4. Use tongs to fry until golden brown on both sides, flipping every minute.

ob 4

5. Drain on kitchen paper.
6. Either eat immediately or warm up later in a hot oven for about 10 minutes.
You can make a mint sauce to dip these in by whizzing up the following ingredients:
Yoghurt (you can also use coconut yoghurt), salt, fresh mint, fresh coriander, pinch of garam masala.

ob 3
ob 2

Bhuna Sauce

I made an epic prawn bhuna the other day and I’ve had a few people asking me for the recipe, so here it is. It doesn’t have to be a prawn bhuna, you can make it with any meat, or tofu, vegetables, paneer (Indian cheese) for vegetarian/vegan options.

bhuna

I make mine dairy free, so I use coconut yoghurt or coconut cream instead of usual yoghurt, but if you don’t mind dairy, feel free to use lovely thick Greek yoghurt. I also use fresh tomatoes because the produce here in Perth is outstanding, but feel free to use tinned tomatoes if you wish.
This is how I skin and prepare my tomatoes – it’s quick and easy and by the time you have chopped your onions and garlic, the tomatoes will be ready to peel. I boil the kettle, and with a sharp knife I cut a shallow cross in the top where the stem was and again on the opposite side. Then I place them in bowl of boiling hot water for about 5-6 minutes.

bhuna 2

Be careful when you remove them because they’ll be hot. The skin should come away easily just by rubbing it slightly, if it doesn’t then they need a bit longer.

bhuna 3

I also remove any thick inner stem and the fibrous part where it attached to the plant. For this recipe I also remove most of the watery seedy part so that the final product is chunks of skinless tomato flesh.

bhuna 4

This recipe is enough to serve 6 people, you can also freeze portions of sauce to use later then you can add fresh chicken, vegetables, or prawns on the day that you serve it.
Ingredients:
a quarter of a teaspoon each of:
coriander seeds
cumin seeds
fennel seeds
black mustard seeds
2 onions (chop one and a half of them and puree the other half in a blender)
2 teaspoons of garlic (either crushed or pureed with the onion puree above)
2 teaspoons of fresh grated ginger (or from a tube if that’s more convenient)
4 large ripe tomatoes
1 teaspoon of turmeric powder
2 teaspoons of chilli paste (or 1 teaspoon of chilli powder)
4 teaspoons of medium curry powder (I use Clive of India but choose your favourite brand or make your own)
300mls of chicken or vegetable stock
2 generous heaped dessertspoons of Greek yoghurt or coconut yoghurt or approx (150-200ml coconut cream)
4 tablespoons of tomato puree
2 teaspoons of garam masala
oil – vegetable, groundnut or something else with a mild or no flavour
salt and pepper

1. Get everything chopped, pureed, and ready:

2. Heat 3 tablespoons of oil in a large pan and add the whole seeds.

bhuna 7
bhuna 8

3. Once you hear them pop and crackle, add the onions, ginger, and garlic and stir to coat them in the spicy mixture.

bhuna 9

4. Once the onions start to soften, add the turmeric, chilli, and curry powder.

bhuna 10

5. Give everything a good stir, cook for a few minutes, then add the tomatoes and tomato puree

bhuna 11

6. Cover and cook for approximately 10 – 15 minutes then stir in the yoghurt and the garam masala. The garam masala will make the sauce take on a brown colour. Once the tomatoes and onions are soft and a bit mushy, turn the heat off and leave the sauce covered to cool down in the pot. Add salt and pepper to taste. If it’s too spicy, add a little sugar to balance the spices. Freeze in appropriate portion sizes.
7. If using the same day, reheat the sauce and add the protein of your choice e.g. raw prawns, chicken, lamb, tofu, veggies and cook until the protein or veggies are cooked through. I used lovely fresh large raw jumbo tiger prawns and they were delicious.
8. Bhuna tends to be quite a dry curry, so use as much sauce as you like that suits your needs. I prefer more gravy so I tend to be quite generous with the sauce. If you reheat it uncovered, you can reduce the sauce if you prefer a thicker, richer flavour.

Mushroom Bhajee

mb 1

500g mushrooms (I use the white round mushrooms, but you can use any)
1 teaspoon black mustard seeds (Rai)
1 teaspoon cumin seeds (Jeera)
2 large teaspoons green masala paste
1 tablespoon dhania/jeera powder (see above)
1 onion chopped medium fine (however you like it)
2 tomatoes chopped and peeled (optional)
1 teaspoon turmeric (Haldi)
2 tablespoons butter or non-dairy spread (optional)
oil such as sunflower, peanut
1 bunch fresh coriander, chopped

1. Heat about 2 tablespoons of oil in a large pan, and add the black mustard seeds and cumin seeds. Fry quickly for a minute or two – they will crackle, and this initial spice/oil mixture is called a ‘vagaar’.
2. Fry the onions in the vagaar, until they begin to soften slightly, then add the green masala paste, dhania/jeera and turmeric.
3. Now add the mushrooms and mix well to coat them with spices. Put a lid on the pan.
4. After approx 5 minutes, add the tomatoes (if using), butter, stir in the coriander leaves and cook on low for a further 5 minutes or until the mushrooms are soft.
5. Taste, and add salt, pepper and a sprinkle of garam masala if needed. There should be enough to serve 4 people as a side dish.

mb 2