It Just Has To Be Delicious

Archive for the ‘Recipe’ Category

Jhinga Caldeen (Goan Prawn Curry)

jc

This curry is fairly quick and easy to make – if you want to be super organised, you can make up the sauce in advance and then just heat the sauce and drop the prawns in when you want to serve it. Make sure that you use raw prawns – they are readily available in supermarkets or your local fish market. Make sure that you remove the shells if you buy them shell-on, and the black gut (as it will be bitter). If you want to make your prawns go further you can slice them lengthways or chop them up. You can also use fish or crab in this curry. The curry is light and coconutty, and you can add as much chilli as you want
depending on your ability to cope with chilli. If you are allergic to garlic like my friend Kara, just replace the garlic with half a small red onion, and season a little more (i.e. add extra salt and garam masala at the end when you are tasting it).
This recipe serves 4 people.

Recipe
400g fresh or thawed raw prawns, gut removed (prawns are ‘jhinga’ – it’s fun to learn the Indian names)
Half a teaspoon of salt
2 tablespoons white wine or cider vinegar
1 teaspoon ground cumin (jeera)
2 teaspoons ground coriander (dhania)
1 teaspoon ground turmeric (haldi)
A quarter teaspoon chilli powder (mirch) you can double this amount if you like a hotter curry
Half a teaspoon freshly ground black peppercorns (gol mirch)
1 small onion finely chopped
2.5 cm fresh ginger peeled and grated
4 large cloves garlic peeled and crushed
2 fresh green chillies seeded and sliced (you can ad extra at the end if the curry is not hot enough)
1 tin of coconut milk (approx 400ml)
2 tablespoons fresh coriander leaves chopped

1. Put the prawns in a mixing bowl with the salt and white wine or cider vinegar – leave to marinate for approx 15 minutes.
2. Mix the dry spices together in a bowl and set aside – this is the cumin, coriander, turmeric, chilli and black pepper.
3. Heat 3 tablespoons oil (sunflower, peanut or similar non-flavoured oil) over a medium heat and fry the onions gently until they are golden – this will take about 8 minutes, don’t burn them.
4. Add the ginger and garlic and fry for a minute.
5. Add the little bowl of ground spices and fry for another minute.
6. Add the coconut milk and the fresh green chillies. After warming this through, taste and add more salt and chilli if required.
7. Add the prawns and cook until they are just opaque – don’t overdo them or they will be tough. Garnish with the fresh coriander.
8. Serve with rice and veggies (e.g. aloo gobi, bombay aloo, mushroom bhajee)

Best Yorkshire Puddings

I used to be terrible at making yorkshire puddings. My efforts were always a bit hit and miss, sometimes really tall and lovely, sometimes flat and stodgy.
In my opinion the perfect yorkshire pudding has to be tall and crispy around the edges and soft in the middle, then you can pour your gravy in the middle and enjoy the contrast of soft and crispy textures.

My epiphany happened when I saw Jamie Oliver making yorkshire puddings. His method is so simple it is ridiculous.

Here are the basic pre-requisites:
1. Have your oven as hot as possible – the ideal time to cook your yorkshire puds is when you have taken the meat out to rest – you can then crank the oven up to between 200 and 220 deg C.
2. Put your tin or tins in early to get the fat as hot as possible – it doesn’t matter if you make individual yorkies in a muffin tin or one big communal yorkie – just get the tin in early.
3. Make sure there is enough fat to cover the bottom of the tin – I use lard because it imparts extra flavour, but you can also use oil.
4. Now for the recipe – use equal volumes of egg, milk and plain flour plus a pinch of salt. I always measure out the egg first – a one egg yorkie in a standard 7 inch round cake tin will serve 2-3 people, so just scale up from there. Use a measuring jug – if one egg measures 50mls, add 50mls of milk and then spoon flour on top up to the 150ml mark. Add a pinch of salt (bigger pinch for bigger volumes) and whisk with a fork or a balloon whisk until it is
smooth. Don’t stress if there are a few small lumps, it will all be ok in the end.
5. When the fat is as hot as it can be, quickly pour the mixture in the tin, put it back in the oven for 15-20 mins and watch it rise perfectly.

yp 1
yp 2

Naan bread

While chatting with my work colleagues who were drooling over the thought of a curry, I mentioned that I cook my naans on the barbecue. When you think about it, it’s an ideal substitute to a tandoor, you can get it very hot, close the lid and cook the naans for a few minutes each side – they puff up really well.
This is the standard naan recipe – if you want to make it more interesting you can mix fresh coriander, into the dough, or fold some cheese in, stuff it with potato, methi/fenugreek leaves or spicy mince (keema), or cook off some minced garlic and mix that through.

naan

Makes 6

Ingredients
yeast mix:
2 teaspoons dried yeast
2 teaspoons caster sugar
150ml lukewarm milk (use soy or rice milk for dairy free version)
Stir the above 3 ingredients together in a small a bowl and leave to froth and dissolve.

450g plain flour
1 teaspoon baking powder
half teaspoon salt (you can also use onion and garlic powder, but if you do this omit the salt)
150ml plain yoghurt (for dairy free version use coconut yoghurt OR approx 60mls coconut cream OR a tablespoon of lemon juice and 2 tablespoons dairy free spread, or omit the yoghurt completely)
1 egg (lightly beaten) OR egg replacer for vegan version OR omit
2 tablespoons oil (vegetable oil is ideal – don’t use a strongly flavoured oil)

Method
1. Sift the dry ingredients into a bowl – flour, baking powder, salt.
2. Add the wet ingredients – yeast mixture, egg, yoghurt, oil.
3. Mix together to form a ball of dough. Knead well.
4. Form into a ball, put a few drops of oil in a bowl and roll the dough in the oil, then wrap the bowl in cling film and leave in a warm place for an hour.
5. Knead the dough again and divide into 6 balls.
6. Roll the balls into naan shapes.
7. Cook on a very hot barbecue for a few minutes each side, or on the bars of a very hot oven. If you have a tandoor, of course, cook them in the tandoor. They should puff up nicely.

Chicken with chilli, ginger and mushrooms

ch ch gi

This is a Ken Hom recipe which I have adapted and every time I cook it, I get compliments from our guests. The original version does not use chilli, so you can leave it out if you want to, but I think it adds a nice dimension. The chunks of chicken in my picture are quite large but if you are feeding a lot of people, make smaller chunks so that it cooks more quickly and evenly.
If you want to serve it with special fried rice as in the picture, make sure that you have some cold cooked rice available. This is then fried in a wok in a little oil with onion, frozen peas and egg approx 4-5 minutes before serving the chicken. Fry the onion first so that it is soft, add the peas so that they thaw, then either add a pre-cooked one egg omelette that has been chopped into small pieces, or cook a raw egg in the oil and break it up with the spatula before adding the rice. Toss the rice around in the wok to distribute the onion, egg and peas, and keep going until it is heated through.
There is some prep to do at least 30 minutes before cooking – make sure you take the dried mushrooms, put them in a bowl or jug, and cover them with boiling water to give them time to reconstitute. You don’t have to use dried mushrooms, but if you do, you get a real depth of flavour and you can use the mushroom water to make the stock.

For the Chicken, ginger and mushroom you need (serves 2-4 people):

Chicken – thighs are more juicy, but you can use breast if you prefer, 100-200g per person should be plenty. This should be filleted and cut into 1 inch chunks.

Chicken marinade – this is enough for 2-4 servings:
Light soy sauce – 2 teaspoons
Shaoxing rice wine (or sherry) – 1 tablespoon
Sesame oil – 1 teaspoon
Cornflour – 2 teaspoons
Black pepper – approx half a teaspoon

Other ingredients:
Dried mushrooms – 25g – make sure these are soaked at least 30 mins ahead of cooking.
Fresh mushrooms (get a nice exotic mixture if you can – shiitake, cloud ears, brown) – 25g
Chilli – 1 small chilli of any variety – regular (or jalapeno if you are a chilli fan)
Ginger – must be fresh – 3 tablespoons peeled and cut into shreds
Garlic – 2 tablespoons peeled and chopped
Shallots or red onion – approx 4 tablespoons finely sliced – this equates to about half a red onion
Fish sauce – 1 tablespoon
Oyster sauce – 1 tablespoon
Sugar – 2 teaspoons
Chicken stock – 150mls – you can buy this ready made or make it up with the mushroom soaking water and a heaped teaspoon of good quality chicken stock powder
Groundnut oil – for cooking – probably a few tablespoons, I always guess mine
Salt and Pepper to taste
Fresh coriander and spring onion for a garnish – if you have some handy – this is optional

Method:
Things to do 30 minutes before cooking:
1. Soak the dried mushrooms in water that you have just boiled in the kettle. They should be soft after about 30 minutes – leave them longer if not. Save the soaking water to make the stock (but remove any leftover bits from it by straining through a tea strainer). Remove the stalks and discard them, slice the mushrooms and set aside.
2. If you haven’t got stock already made up, make up 150ml of chicken or vegetable stock by either a) using a stock cube or b) a heaped teaspoon of good stock powder with 150 – 200 mls of the mushroom water. Simmer in a little pan to dissolve all of the cube or powder and set aside. Bear in mind that some will evaporate so use more than 150mls of water and top it up if necessary. Alternatively you can use good quality store bought stock or bone broth in a carton – try to get the reduced salt variety.
3. Marinate the chicken in 2 teaspoons of light soy, 1 tablespoon shaoxing rice wine, 1 teaspoon sesame oil and some salt and pepper. Ken Hom says to use one and half teaspoons of salt, but I leave the salt out because the soy is quite salty. I do add about half a teaspoon of pepper though. Once the liquid marinade is mixed through, add about 2 teaspoons of cornflour and mix again – this will make the coating thicker and cling to the chicken, give it a good mix so that it isn’t lumpy.
4. Prep all the ingredients – peel and finely slice the ginger, garlic and shallots, slice the mushrooms. Slice the chilli and remove the seeds if you don’t like your food too spicy.

Cooking the chicken for the first time (this can be done in advance if you are prepping this for a busy dinner party):
1. This first cooking gives the chicken the flavour of the ginger and chilli and also makes the ginger and chilli lovely and crispy to add another nice texture to the dish.
2. Put approx 2-3 tablespoons of groundnut oil in a pan or wok and heat it until it is just smoking.
3. Add the chilli and ginger and fry for a minute until crispy.

ch ch gi 2

4. Add the chicken and fry for another 4-5 minutes until almost cooked. The time will depend on how big the chunks are – if in doubt slice a piece to see if it is almost cooked through – if it is too pink, leave longer.

ch ch gi 3
ch ch gi 4

5. Drain the chicken and reserve approx 1 tablespoon of the oil. Keep all of the crispy chilli and ginger pieces. If you are clever in the way that you do this, you shouldn’t have to clean the pan.

Putting it all together:

1. Reheat the wok or pan with the remaining tablespoon of oil (don’t worry if you lost it all, just add another tablespoon of fresh oil).
2. Add the shallots and garlic and fry for a minute to soften.
3. Add the mushrooms (dried and fresh), and continue to stir fry and soften.

ch ch gi 5

4. Add the fish sauce, oyster sauce, stock and sugar. Return the chicken to the pan.

ch ch gi 6

5. Leave to simmer for 3-5 minutes to make sure that the chicken is cooked through.

ch ch gi 7

6. Taste the sauce and add salt and pepper to adjust seasoning if necessary.
7. Serve with rice and garnish with fresh coriander and sliced spring onions.

Fried Kway Teow

ckt

If you have leftover chicken or some veggies to use up, there’s nothing easier than char kway teow for a quick supper.
You can make this dish entirely with vegetables, it will work fine like that, however if you want to add some meatlike texture, feel free to add mock meat.
Firm tofu chopped into small bite size pieces also works well.

You will need some flat rice noodles (pad thai noodles) and some beansprouts – I tend to use the dry ones and allow 75g dry weight per person, but you can use the ready softened ones if you like.

1. Boil the kettle, and soak the dry noodles in a bowl in boiling hot water – they will take about 5 minutes to soften – test them regularly and drain them in a colander when they are done to your liking. Stir a little oil through them to keep them separate.
2. Peel and chop a clove of garlic, slice a small onion, and any other veggies that you may have handy – you can slice mushrooms, tomatoes, capsicum, chilli, carrot, broccoli, cabbage etc. most veggies will work as long as you slice them small enough to cook quickly.
3. If you have some leftover roast chicken, slice that too, you can also use prawns – I think that raw tiger prawns work best, each prawn chopped into 3 or 4 pieces. I have also added sliced chinese sausage (lap cheong) to mine, but you don’t have to if you can’t find any.
4. Heat some oil in a wok – use peanut or canola oil because they will not add flavour. Fry the onion and garlic for a few minutes, then add vegetables in order of hardness – harder veggies first (like carrot and capsicum), squishier veggies last (like tomato and beansprouts).
5. If you like it spicy, add a generous dollop of chilli paste (sambal oelek) while you are cooking the veggies.
6. Add the leftover chicken or prawns. Add two to three tablespoons of ketjap manis (thick sweet soya sauce), and a squeeze of lime. Now add the drained noodles and stir fry, coating the noodles in the sauce.
7. Garnish with some crispy onions and/or crushed peanuts. Nice.

Chocolate Twists

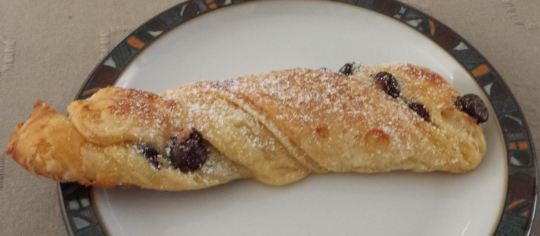
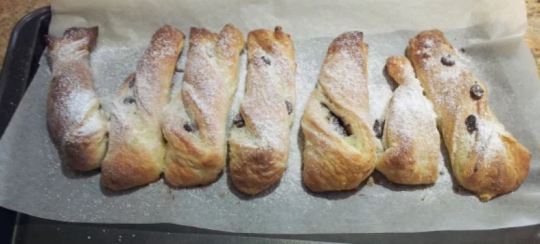
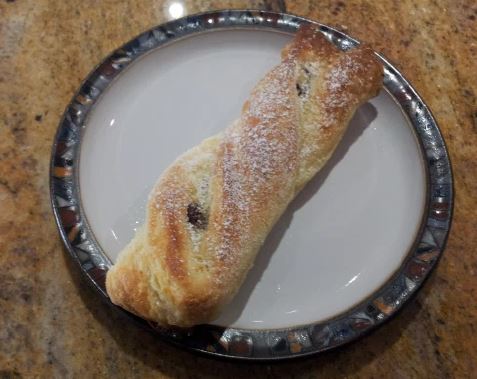
I made chocolate twists today using my favourite croissant dough recipe, and they were so delicious that I think I should immediately give up work and manufacture chocolate twists for a living.

choc twist

The recipe can be varied to use dairy free spread, but you would probably need less of the dairy free spread or vegan butter.

My success with croissant dough has been a bit up and down, so I have been holding off posting a recipe until I got it just right, but I think this week has taught me that if you leave the dough in the fridge for a few days (e.g. 4-5 days) it just gets better and better.
I also love the maths and science associated with this dough, because the reason that the layers puff up is because the butter creates steam when placed in a very hot oven, so the key thing is to have lots of layers of butter within the pastry, and to have the oven hot when you put the dough in to cook. Please don’t be put off by the dough recipe, it really is quite simple. I recommend rolling and folding it five times, but each roll and fold is very quick, and I can have this dough made and in the fridge in half an hour easily.

The number of rolls and folds is very important. The first fold gives you 3 layers, the second fold gives you 9 layers, the third fold gives you 27 layers, the fourth fold gives you 81 layers, and the fifth fold gives you 243 layers. You can go on and do further folds if you like, but I find that five is sufficient.
The following quantity will make 6 croissants or chocolate twists plus you should have a little bit left to make a little sampler piece – every time I cook I like to make a little taster portion so that I can eat some straight from the oven without breaking into the main yield. If you need a larger quantity, just increase the amounts accordingly.

Dough Recipe
1 cup (150g) of plain flour
37mls water
37mls milk
14g sugar
18g melted butter
a quarter of a tablespoon of yeast
half a teaspoon of salt
70g butter slightly soft

1. Flatten the 70g portion of butter between two sheets of baking parchment to form a square approximately 13-14cm square. Wrap it in the parchment and place it in the fridge.

2. Mix all the other ingredients together in a bowl. Stir with a spatula to combine and as they come together, use your hands to knead the dough into a ball. If you have time, wrap it in cling film and place it in the fridge for approx 30 minutes.

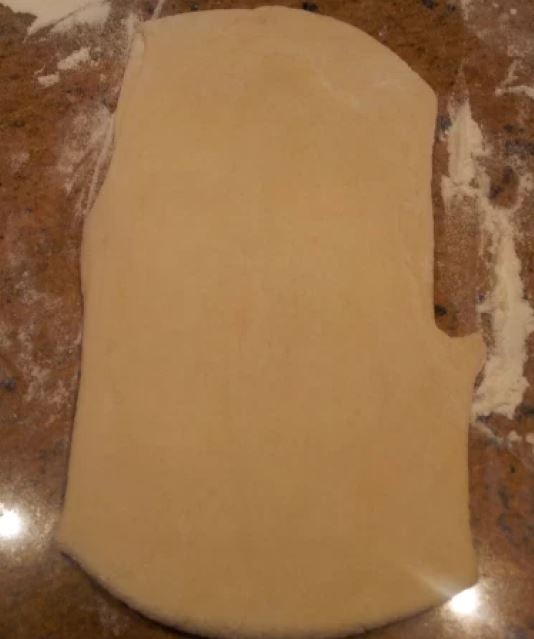
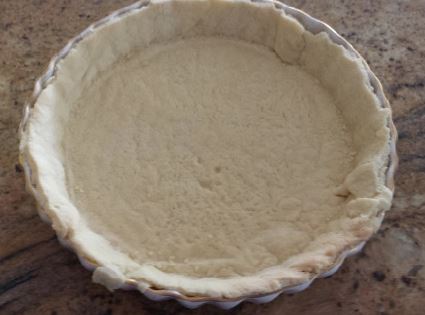
3. Roll out the dough onto a floured surface into a large square.
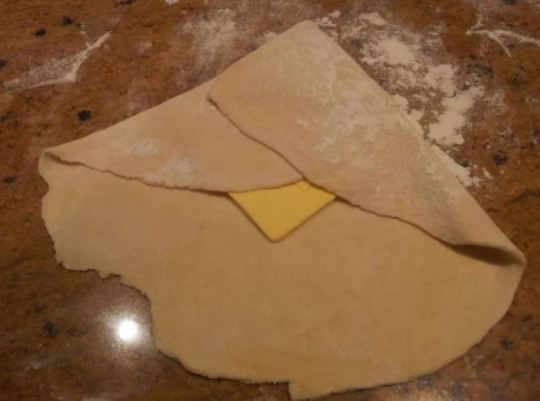
4. Place the butter square in the middle of the dough in a diamond shape, and wrap the dough around the butter, overlapping it to avoid the butter oozing out. You will see from my pictures that my edges are a bit rough – but don’t worry, it really doesn’t matter.

ct 7
ct 8
ct 9
ct 10
ct 11

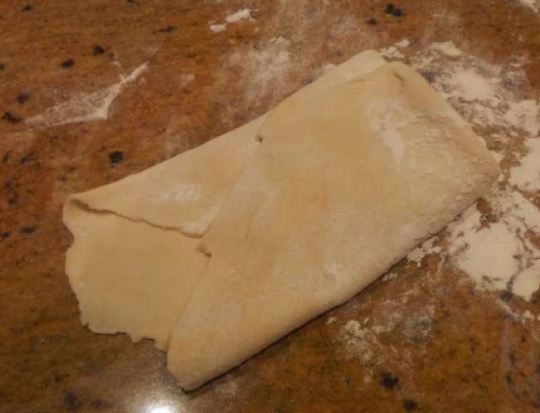
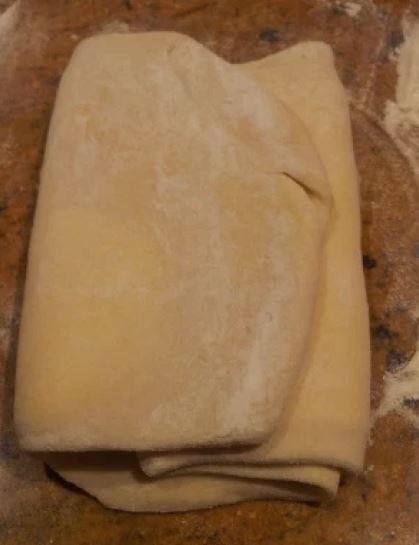
5. Roll the dough into a rectangle, if any pieces of butter poke through just sprinkle them with flour and continue.

ct 12

6. Fold the rectangle into three as if you are folding a letter ready to be placed in an envelope.

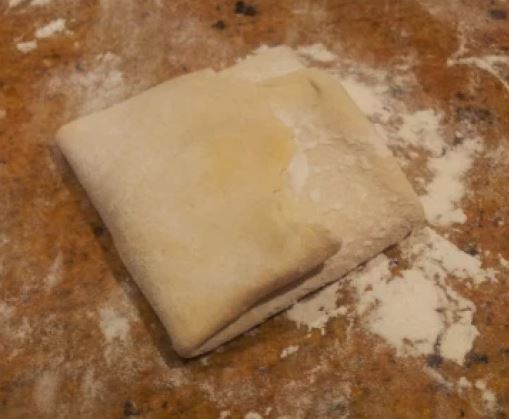
7. Turn the dough by 90 degrees and roll and fold again so that this time you are folding it in the other direction. Keep doing this until you have turned, rolled and folded at least 5 times. If at any time the butter gets really sticky, wrap the dough in cling film and put it in the fridge for a while.

ct 15

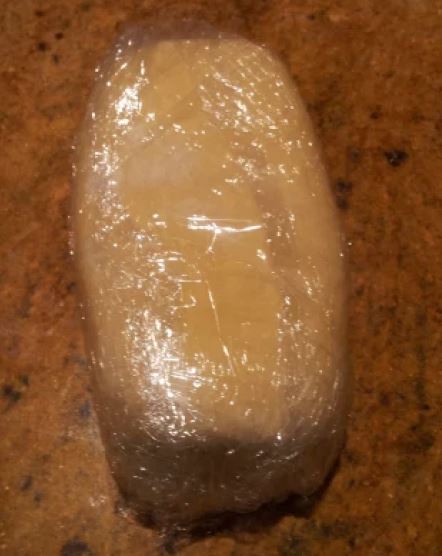
8. When you have finished, wrap the dough in cling film and refrigerate. You can leave it for 5-6 days, the longer you leave it, the better it will be.

ct 16

Creme Patissiere for filling (the filling is not compulsory but is very nice)
1 egg separated
1 tablespoon cornflour
1 tablespoon plain flour
15 – 25g sugar (depending on how sweet you want it to be)
150ml milk
1/2 tablespoon vanilla essence

1. Separate the egg into two bowls. Add the sugar to the yolk.
2. Using an electric whisk, whisk the egg white until it is stiff and fluffy. Set this aside for later.
3. Don’t wash the whisk, go straight on to whisking the yolk and sugar until it is pale yellow and creamy smooth. Add the cornflour and flour, and a splash of the milk and whisk again.
4. Heat the remaining milk gently in a non-stick small saucepan until almost boiling.
5. While stirring, pour the milk onto the egg yolk/sugar/flour mixture, then return the whole mixture to the saucepan and heat very gently, stirring all the time to avoid sticking. Scrape every morsel from the bowl.
6. It will thicken fairly quickly, keep stirring so that it doesn’t go omeletty, and add the vanilla essence.
7. Now add half the whisked egg white (this is all you need, but you can add more if you need the custard to be looser). Fold the egg white into the custard, return to the heat and gently cook for a further 2 minutes.
8. Remove from the heat and leave to cool.

To make the twists
1. Heat the oven to approx 200-220 deg C.
2. Line a baking sheet with baking parchment.
3. Roll out the pastry into a square approx 32cm square (the exact size does not matter).
4. Now cut it vertically into strips approx 5cm wide.
5. Spread the creme patissiere (if you are using it) along the middle of the strips and scatter dark chocolate chips along the bottom half of each strip. (You will need approx half a tablespoon of chips for each twist).
6. Fold each strip in half from top to bottom, and press around the edges. Now stretch and twist each strip and place them on the baking sheet side by side.
7. Leave them in a warm place for approx an hour to expand.
8. Brush with milk or egg and bake for approx 15 minutes until golden and puffed up.
9. Sprinkle with sieved icing sugar.

ct 17

ct 1

Chocolate Caramel Pie

When I saw the good quality chocolate and cream at the Herdsman, I was inspired to make choclate caramel pie again. I made the caramel using the Dulce de Leche method.

ccp 1

I used Gippsland cream (which is the closest thing to Clotted cream that I have seen in Australia, so thick and luscious) and Hachez 77% chocolate. It is important that the chocolate is a high percentage cocoa because it needs to contrast with the sweet caramel.

Pastry:
1 1/4 cups or 190g of plain flour
1/4 cup or 40g self raising flour
1/4 cup or 50g caster sugar (I use brown sugar and pass it through a sieve)
90g unsalted butter
1 egg
Pinch salt

Method:
1. Sieve the flours and sugar into a food mixer.
ccp 4

2. Cut the butter into small cubes and add it to the flour/sugar. Start the food mixer and mix until the mixture resembles fine breadcrumbs (you can rub the butter in using your fingers if you like, but I have warm hands, so I use a food mixer).

3. Pour the mixture into a bowl and add the egg and a pinch of salt. (My photo shows a double quantity which is why there are two eggs). Mix with a spatula or wooden spoon until it comes together, then using your hands, lightly knead and shape it into a round (keep handling to a minimum, and if you have warm hands like me, rinse them in cool water first so that you start off with cool hands).

4. Roll the pastry out into a round and use it to line a flan tin or dish. Put the pastry lined flan dish in the fridge for approx 30 mins if you have time – this will stop it from shrinking away from the edge in the oven.
5. Cut a circle of baking parchment slightly bigger than the middle of the flan dish, and put some ceramic baking beans in the middle. Bake for 10 minutes at 190 deg C, then remove the baking beans and bake for a further 10 minutes. (The baking beans just stop the middle of the tart case from rising too much, you can get away without using them, but you will need to prick the base with a fork, and you may find it will rise a little).
6. Remove the dish from the oven and leave the pastry to cool to room temperature.

The caramel (dulce de leche method):
1 tin of condensed milk (must be condensed – not evaporated) Check that the tin is in good condition, do not use if dented – the lid must be unopened and not damaged.

1. Using an old saucepan, place the unopened tin of condensed milk in the saucepan, cover with water.
2. Bring to the boil and simmer gently for 3 hours. You can cover it with a lid to stop the water from evaporating too much. Check it every hour to make sure that the water is not boiling dry – top the water up as necessary.
3. Carefully remove the tin from the water and leave it to cool thoroughly – it can be stored in the fridge until needed. Do not attempt to open it while it is still warm – I have heard stories of some tins exploding when opened, but I have never had a problem – be sensible just in case – cover it with a cloth when opening.

ccp 9

Regular Caramel:
Use this method if you don’t have condensed milk
300g golden caster sugar
175g butter
200ml double cream

1. Place the sugar in a pan with2 tablespoons water. Heat until it dissolves but do not stir.
2. Boil until amber.
3. Stir in the cream – add a pinch of salt if you like salted caramel.
4. Stir in the butter and simmer for a further 3 minutes.

Chocolate Mousse:
200g good quality dark chocolate, coarsely chopped
2 tablespoons icing sugar

1 1/2 cup (375ml) of whipping cream, whipped with the icing sugar
1. Place the chocolate in a bowl and melt by placing the bowl over a saucepan of gently simmering water (the base of the bowl must not dip into the water) – or use a microwave if you are confident that you can melt it perfectly. Personally I use the saucepan double boiler method – I am not a fan of microwaves.
ccp 10

2. Cool the mixture for 5 minutes.
3. Fold in half of the whipped cream/icing sugar mixture – it will look claggy at first but keep folding with a spatula, then add the rest and fold again.

To assemble:
When the pastry case is cooled, you can add the caramel to the base of the pastry case. If you like salted caramel you can add a few scant flakes of sea salt on top of the caramel (if you have not already salted it).
ccp 12

Put the caramel coated pastry case in the fridge so that it is completely cool before adding the mousse. This will help to keep the layers nice and separate.
ccp 13

Top the cool caramel with the mousse mixture and leave to set in the fridge. 3-4 hours should do it.

ccp 1

This recipe was inspired by Soda’s beautiful chocolate caramel pie at the North Beach cafe. Sadly Soda is no longer in business:

ccp

Linguine with meatballs

ling 1

When I visited The Herdsman I chose some ingredients that would make it easy to prepare a quick midweek meal. With the array of fresh pastas and sauces, it was hard to choose, but in the end I settled for linguine, meatballs and a puttanesca sauce. The meatballs were quite large and took approx 8 minutes to cook. Meanwhile, I boiled the kettle ready for the pasta.

ling 2

Once the meatballs were nicely browned on the outside, I added the sauce along with some chopped mushrooms and onion. You don’t have to, but you can add anything you like to pimp up the sauce, like chilli, garlic, bacon, peppadew peppers, fresh tomatoes etc.

ling 3

The pasta took approx 4-5 minutes in boiling salted water, and I served the dish with the rest of the Herdsman’s garden salad and a sprinkle of parmesan. The whole dish took less than 20 minutes. Ideal for midweek and delicious too.

Prawn Ravioli with crabmeat and prawn oil

When I came home from the Herdsman with my basket of goodies, I set to work cooking, newly inspired by what I had seen and sensed in the shop. My first recipe was a home made prawn ravioli on a butternut squash puree, with crab meat and prawn flavoured oil.
This is based on a Gary Mehigan recipe but has my own personal twist.

PRAWN RAVIOLI ON BUTTERNUT SQUASH PUREE WITH CRAB MEAT AND PRAWN OIL
pr 1

The amount that I made was enough to feed 3 people comfortably or 2 greedy people ! I bought a ready cooked swimmer crab from the Herdsman and used a crab pick to remove the meat, but you can cook a raw crab if you prefer. Once the crabmeat is prepared, you need to get the ravioli filling ready, and the oil infused with flavour.

pr 2
pr 3

For the oil you need :
6 large tiger prawns (approx 200g)
200ml of good olive oil
2 bay leaves
1 star anise
1 teaspoon of tomato paste/puree
1 small fennel bulb
pr 4

I had 6 huge prawns, which I de-shelled and removed the black food canal from (you do this by gently running a knife along the back of each prawn and easing the black tube out with the knife tip). I then sliced a fennel bulb thinly (you need about 30g but the exact quantity doesn’t matter too much). I placed the prawn shells in a pan with approx 2 tablespoons of olive oil, the sliced fennel, 2 bay leaves, and a star anise. When the fennel is soft, add more oil (up to 200ml) and a teaspoon of tomato paste/puree. Put the lid on and continue to heat gently for 20-30 minutes to infuse the flavours into the oil. Keep the prawn
meat for the ravioli filling. When the oil is done, pass it through a sieve to remove the shells and spices, discard the shells.

pr 5
pr 6

For the filling you need:
Prawn meat as above (approx 200g)
1 egg white
a pinch of cayenne pepper or smoked paprika
the zest of half a lemon
1/8 – 1/4 teaspoon of salt
100ml thick cream

Whizz up all of the ingredients in a food processor, adding the cream last as you may not need all of it. Try 50mls of cream first and check the texture – it should be soft but not runny. We want the filling to hold together inside the ravioli.

pr 7

To make the ravioli, you can either make fresh pasta or buy lasagne sheets. I bought lasagne sheets both for convenience and because I wanted to test the quality of the Herdsman’s produce. You can make your own pasta dough by mixing 200g of ’00’ flour with 2 beaten eggs, a tablespoon of olive oil and a pinch of sea salt in a food processor. This dough should be left to rest for a while at room temperature before passing it through a pasta machine.

pr 8

To make the ravioli, cut a rectangular piece of dough approx 6cm x 12cm. Place a small spoonful of filling in the centre. Brush some milk around the edges and fold it over, making sure that you push out all of the air while you are sealing up the pasta. If the edges look uneven you can trim them with a knife or a wavy pasta cutter. The ravioli take approx 5 minutes to cook in boiling salted water.

pr 9

 pr 10

For the butternut squash puree you need:

300g of grated butternut squash
60g butter or dairy free spread
80ml milk

Melt the butter in a large saucepan and add the butternut squash. When it starts to soften, add the milk, cover and cook for 6-8 minutes. Season with salt and pepper, then use a stick blender to puree it. You can also sieve the mixture if you want it to be really smooth. This can be made in advance and reheated while the pasta is cooking.

pr 13

To assemble the dish, place some butternut squash puree on the plate, the ravioli on top, and some fresh crab meat on top of the ravioli. Drizzle some of the flavoured oil around the dish.
I served this with one of the Herdsman’s pre-prepared garden salads and the olive and onion bread.

Raspberry and Peach Scones

sc 1

sc 2

Recently I have made some very successful blueberry scones and I had the idea to try a kind of melba scone using raspberries and peach icing. The Herdsman had some lovely raspberries on display, so I made sure that they went in my basket. The recipe is very similar to the blueberry scone recipe.

Recipe:
2 cups (approx 250g) self raising flour – however, if you only have plain flour, you can add 2 teaspoons baking powder
half a teaspoon of salt
2 tablespoons sugar
1 teaspoon baking powder (even though it is self raising flour, I added a little extra boost)
5 tablespoons (70g) butter or non-dairy spread
1 cup of raspberries (this is approx one small 150g punnet)
1 cup (250ml) of double cream or some cocnut cream/yoghurt
For the glaze – approx 1 cup (140g) of icing sugar and half a fresh peach

Method
1. Heat the oven to 200 deg C and line a baking tray with some baking parchment.
2. Mix the dry ingredients in a bowl or food processor i.e. the flour, baking powder, salt and sugar.
3. Either rub in the butter or use the food processor to blend it in until it is like fine breadcrumbs.
4. Stir in the raspberries.
5. Add the cream (if using coconut cream or yoghurt, add less than the recipe states and gradually add more as needed) and very gently fold it in without crushing the blueberries, then pat the mixture together to form a soft dough. Treat it very gently, it does not have to be perfectly smooth.
6. Roll the dough out into a long rectangle approx 12 inches by 3 inches. It will be quite a thick layer of dough (1-2 inches thick) Cut this in half, then cut each piece in half again so that you have four pieces approx 3 inches square. Cut each piece diagonally so that you have 8 scones.
7. Brush each scone with some cream (or milk or coconut cream) and place on baking tray. Bake for approx 25 minutes.
8. To make the glaze, sift the icing sugar into a bowl. Peel the peach and puree it using a stick blender. Add the puree to the icing mixture a little at a time until you get a soft glaze which isn’t too runny.
9. Spread the glaze over the top of each scone.

Did my idea work ? Well it was 50% successful. The raspberries were delicious in the scones although they are not quite as robust as blueberries, so they spread and bleed into the mixture a lot more. The peach icing tasted very sweet and not particularly peachy. If I were doing this again I would maybe include some peach chunks in the scone mixture and use a lemon glaze as before, or maybe no glaze. The scones did taste lovely, it’s just the glaze that needed some refinement. Again I was very impressed with the quality of the Herdsman’s ingredients.