It Just Has To Be Delicious

Archive for the ‘Recipe’ Category

Blueberry and Lemon Scones

I made these scones this morning when my friend Sarah came to visit. They taste incredibly good. If you treat the dough really gently, the blueberries keep their shape and they burst in your mouth as you eat the scone. you can also make them with raspberries and strawberries and you can add chunks of white chocolate if you want to be a bit decadent, but I found them sweet enough with just the lemon glaze.

bls 1
bls 2

Ingredients:
2 cups (approx 250g) self raising flour – (if you only have plain flour, you can use plain and add 2 teaspoons baking powder)
half a teaspoon of salt
2 tablespoons sugar
1 teaspoon baking powder (even though it is self raising flour, I added a little extra boost)
5 tablespoons (70g) butter or non-dairy spread
1 cup of blueberries (this is approx one small 150g punnet) washed and patted dry with kitchen roll
1 cup (250ml) of double cream (or approx 100ml of premium coconut cream if you are dairy free/vegan, this also works with coconut yoghurt)
For the glaze – approx 1 cup (140g) of icing sugar and half a fresh lemon

Method:
1. Heat the oven to 200 deg C and line a baking tray with some baking parchment.
2. Mix the dry ingredients in a bowl or food processor i.e. the flour, baking powder, salt and sugar.
3. Either rub in the butter/dairy free spread, or use the food processor to blend it in until it is like fine breadcrumbs.
4. Stir in the blueberries.
5. Add the cream and very gently fold it in without crushing the blueberries, then pat the mixture together to form a soft dough. Treat it very gently, it does not have to be perfectly smooth. (If using coconut cream, just add 50ml to start and then add more as you need it – you shouldn’t need more than 150ml in total but it depends on the consistency of the coconut cream. I also added a teaspoon of lemon juice when I used coconut cream, because regular milk has an acid in it and I think you need a little acid to help with rising. A little
cream of tartar would also work)
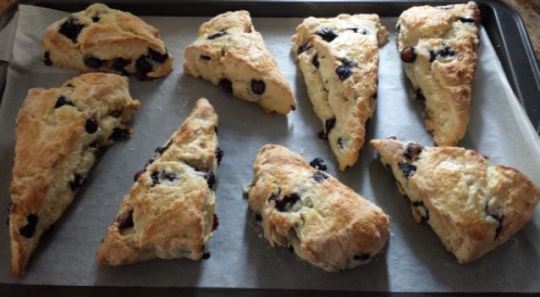
6. Roll the dough out into a long rectangle approx 12 inches by 3 inches. It will be quite a thick layer of dough (1-2 inches thick) Cut this in half, then cut each piece in half again so that you have four pieces approx 3 inches square. Cut each piece diagonally so that you have 8 scones.
7. Brush each scone with some cream (or milk) and place on baking tray. Bake for approx 25 minutes. If brushing with coconut cream, bear in mind that they will not brown like milk basted scones, so touch them gently to test if they are done. If they are a little blonde, it doesn’t matter, because the top will have icing on it.
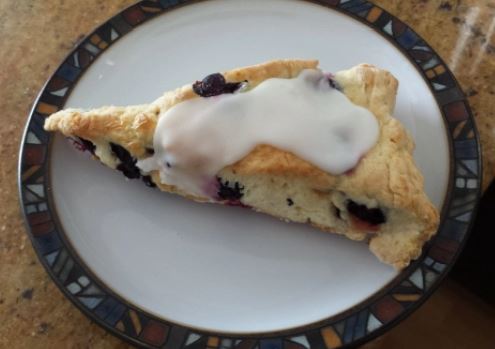
8. To make the glaze, sift the icing sugar into a bowl. Wash the lemon, then grate the zest from the lemon – add this to the icing sugar. Halve the lemon and squeeze the juice. Add the juice to the icing mixture a little at a time until you get a soft glaze which isn’t too runny. You want it to flow, but not run off the scones.
9. Spread the glaze over the top of each scone. You can use a piping bag if you like, or just use the back of a spoon like I did.
10. Enjoy with tea, coffee and friends.

Smoothie Bowls

Smoothie bowls are a great breakfast idea and they can be made up in advance. The possibilities are endless, but one of my favourite breakfast smoothies is a combination of frozen blueberries, frozen cherries, almond milk, soy milk and protein powder. I bulked this up a bit by adding some cooked quinoa and then topped it with sliced banana, chia, strawberries, dried apricots, almonds and a few chocolate nibs.

sm bo

To get the best smoothie bowls, you need to be a little bit organised at the start of the week. If using quinoa, wash and cook up a small amount and keep it in the fridge in a sealed container. Put some chia seeds in a jar and soak them – they should swell with the water and form a gel like slurry. The smoothie can be made up in advance but will probably need a stir in the morning, then all you need to do is add your toppings.

Frozen berries make a great smoothie base because you don’t have to add ice. You can use blueberries, strawberries, raspberries, cherries and some of the mixed berries too. Fresh berries are also good but don’t add the coldness to the smoothie.

You can use whatever milk you like and add yoghurt – thick greek yoghurt has a great protein content – and if you prefer not to add dairy you can use coconut yoghurt. For a bulkier smoothie you can add protein powder, quinoa, oats, psyllium husk and shredded coconut, and you can also soak cashews in water and whizz them up in the blender for a lovely cashew cream. I like to mix my milks so that I get a good fat/carb/protein mix.

Toppings can be fresh or tinned fruits – peaches, pears, apples, banana, strawberries, kiwi, lychees, pineapple.

You can also add nuts – if they are slightly toasted, that’s even better, and you can crush them too. You can also sprinkle desiccated coconut over the top.
Dried fruits make a great topping – sultanas, apricots, dates, figs.

Soaked chia is a nice addition, also agave syrup, maple syrup, honey and even a slight drizzle of nutella. Yum. Every bowl can be different, and they are fun to make.

Tiramisu

What do you think of when you think of Tiramisu? Is it creamy, is it chocolatey, is it custardy? I imagine that every Italian home and restaurant has their own special recipe, but the one that I really enjoy that reminds me of Italy is the recipe that I devised after tasting the house speciality tiramisu at Alla Rampa Restaurant in Rome.

tir 1

Alla Rampa is just under the Spanish Steps, and I was so impressed with the dessert that I went back for seconds the next night. Their version is dished up from a large flat baking tray, and is coffee and sponge covered in the most delightfully light custard with marscapone and sprinkled with powdered chocolate. No creamy layers or chocolate layers in sight. I once made this for Nancy Lam and she cleaned up the dish by scooping out the remnants with her fingers and licking them, such an amazing compliment from a great lady.

If you are ever in Rome, please make sure that you pay a visit to Alla Rampa to try this amazing dessert. If you are not likely to go to Rome in the near future, follow the recipe below and let me know what you think – I hope you love it. The quantities are approximate because I made the recipe up, please feel free to adjust them to suit your taste.

Recipe
1 pack of Boudoir or Savoiardi biscuits (these are sponge fingers which soak up the coffee and liqueur)
tir 2
1 coffee based liqueur miniature such as Tia Maria or Kahlua (approx 100mls)
1 cup of strong black coffee (e.g. use 3 heaped teaspoons of instant coffee, or if you prefer,
make ‘proper’ coffee) cooled
4 eggs – separated – whisk 2 of the whites into stiff peaks, save the other 2 whites for when
you want to make a meringue
100g caster sugar
4 level tablespoons plain flour
4 level tablespoons cornflour
600mls milk
2 teaspoons vanilla extract
250g – 300g marscapone
chocolate powder for sprinkling

Method
1. Take a large shallow dish and arrange the savoiardi biscuits in the dish so that the base is completely covered. If you have an oval dish like me, you will need to line the biscuits up like soldiers and then break some to fill the gaps around the edge.

tir 3

2. Pour the liqueur over the biscuits trying to ensure that each biscuit gets a splash of liqueur. Now pour the coffee over the biscuits – use half the coffee first and see how it goes. The biscuits are very absorbent, so you are likely to need all of the coffee.

tir 4

3. Whisk together 4 egg yolks and the sugar until thick and pale. Beat in the flour and cornflour along with a large splash of the milk.
4. Heat the rest of the milk in a medium-large saucepan until almost boiling, and pour it onto the egg mixture, stirring constantly.
5. Now tip the whole mixture back into the saucepan (use a spatula to scrape every drop out of the bowl), and heat again on a low heat, stirring all the time (otherwise it will stick). When it has boiled and thickened, remove it from the heat.
6. Fold in the whisked egg whites and return to the heat for a few minutes, you can also add the vanilla extract at this point.
7. Remove from the heat, cool for a few minutes and stir in the marscapone. The marscapone should melt quite nicely into the mixture, keep stirring until it is smooth and lovely (taste a nice big spoonful just to be sure). You can add extra marscapone if you like a creamier texture, it’s up to you.

tir 5

8. When it has cooled down sufficiently, it can be lukewarm, but not hot, pour it over the soaked biscuits so that all of the biscuits are covered.

tir 6

9. Using a sieve, sprinkle chocolate powder over the top so that it is completely covered. Chill for at least an hour, and serve only to your most deserving friends.

tir 7

Homemade baked beans

Canned baked beans….meh. They’re great for a quick and convenient snack, but beware – the average can of beans has 21g of sugar. It is simple to make your own, you then know exactly what goes into them, and you can also mix up your beans if you like. You don’t have to use haricot, you can use cannelini, pinto, navy, any type you like or a mixture.

Beans

My recipe uses chorizo, you can also use bacon if you don’t like the strong flavour of chorizo, or if you are vegetarian, you can leave out the meat (or include vegan sausages) and up the flavour stakes with additional herbs and spices. This recipe makes enough for 4 serves for dinner or approx 6 batches of smaller lunch-time serves. Quite an easily portable snack too. You can also serve more people at dinner by adding other ingredients to the plate such as toast, cheese, eggs, sausages, chips, hash browns and sauteed mushrooms.

Ingredients:
2 x 400g cans of beans of your choice (you can also use dried beans if you soak them overnight)
1 x 400g can of diced tomatoes (or about 6 large Roma or Truss tomatoes skinned and chopped)
1 average sized onion, diced
1 clove of garlic, very thinly sliced or chopped
Optional extra veg: a small chopped carrot, a small chopped capsicum
1 chorizo chopped into small dice, or two to three rashers of smoked bacon diced or vegan sausages chopped
1 teaspoon of Worcester sauce (If vegan, use a spoon of liquid smoke instead)
1 teaspoon of dijon mustard
1 teaspoon of smoked paprika
Half a teaspoon of cumin powder
1 teaspoon of mixed herbs, dried, fresh or freeze dried
1 teaspoon of vegetable stock powder
salt/pepper/sugar to taste

Method:
Prepare the chopped ingredients:

beans 2

If using canned beans drain them:

beans 3

Fry the chorizo, or vegan sausages, (or bacon) in a few tablespoons of olive oil until it is slightly crispy and the fat has rendered.

beans 4

Add the onions and garlic (and the carrot and capsicum if including them):

beans 5

Once the onion begins to soften add the flavourings – mustard, cumin, paprika, herbs, Worcester sauce, stock powder.

beans 6

Stir everything to combine well and then add the tomatoes.

beans 7

Half fill the tomato can with water, swirl it to rinse the last bits of tomato and add it to the pan. Alternatively just add a little extra water if using fresh tomatoes.

beans 8

Add the beans, but try not to stir them too much (this tends to mush them up. Shake them around the pan.

beans 9

Leave to cook for 20 – 30 minutes until the beans are soft enough to eat. Add salt and pepper to taste. You shouldn’t need to add sugar, but if you do, consider adding some honey or agave syrup instead of granulated sugar.
Serve in a bowl with fresh crusty bread and some grated cheese. So simple and tasty that you’ll probably never buy cans of baked beans again.

Vegan version with vegan sausages and carrot:

beans v

My favourite cheesecake

chck 2

For me, the best cheesecakes are baked. I think the texture is much better than the whipped and refrigerated versions.

This is my favourite cheesecake recipe – every time I make it, it turns out well. It is based on Nigella Lawson’s London cheesecake recipe, but with a few minor variations, which I will explain as I go along. It is baked in the oven in a ‘bain marie’ which is effectively a water bath. You make the bain marie by filling a roasting tin with hot water and placing the tin of mixture into it. It is really important to line the tin with strong foil to avoid water seeping into the mixture. Make sure that you buy the extra long heavy duty foil – I use 3 layers to protect the tin and scrunch it all up around the top of the tin. Don’t buy the shorter length foil because you will have to overlap it, and the water will find a way of getting through. I also use a springform tin – you don’t have to, but if you want to present your cheesecake on a nice plate, you will need to turn it out and a springform tin is the best option. Make sure that the base of your tin is firmly in place before you fill the tin with mixture. If you push the bottom of the tin from underneath, it should not dislodge – if it does move then your base is not properly seated – push it hard until it ‘pops’ into place. Failure to do this will mean that you lose some of your mixture through seepage.

chck
Recipe
150g plain digestive biscuits (as my friend Sue said, “use the proper ‘pommie’ ones” e.g. McVities)
75g unsalted butter melted or very very soft
500g cream cheese (Nigella says to use 600g, but in Australia it comes in 250g tubs, so I use 500g with an 18cm tin instead of 600g with a 20cm tin. I also use one tub of ‘value’ cream cheese which is harder, and one tub of better quality or light cream cheese which is softer – if you use two tubs of good quality the texture will be too soft.)
100g caster sugar (Nigella uses 150g, but I think this is sweet enough)
3 large eggs
3 large egg yolks
1 1/2 tablespoons of vanilla extract
2 tablespoons of lemon juice (Nigella uses slightly less)
18cm Springform tin
Heavy duty long tin foil
For the topping
200ml tub sour cream (Nigella uses less, but I like a nice layer on top)
1 tablespoon caster sugar
Half a teaspoon of vanilla extract

1. Process the biscuits until they are like crumbs in a food processor (or put them in a bag
and bash them with a rolling pin). Mix in the butter and use them to line the bottom of the springform tin, pressing them down so they are smooth and level. If you want to make it easier to remove the cheesecake from the base of the tin, you can line it with a layer of baking parchment before adding the biscuits, but this step is not compulsory. Put the tin in the fridge to cool and set the biscuit layer. Heat the oven to 180 deg C.
2. Beat the cream cheese until it is soft (you may prefer to use a food mixer for this, but you can also use a wooden spoon and some elbow grease). When it is smooth add the sugar. Beat in the eggs and egg yolks, then the vanilla and lemon juice. Boil the kettle.
3. Line the outside of the chilled tin with strong foil so that it covers the bottom and sides in one large piece. Repeat with another layer (I actually use 3 layers for extra safety, but you don’t have to). This will protect the filling of the tin as it cooks in the water bath.
4. Pour the cream cheese filling onto the biscuit base and place the springform tin inside a roasting tin. Fill the roasting tin with hot water from the kettle until it comes halfway up the sides of the springform tin. Carefully place the whole thing in the oven and cook for 50 minutes.
5. Just before the 50 minutes is up, whisk the topping ingredients together in a bowl – sour cream, sugar and vanilla.
6. Check the the cheesecake is almost set – it should be set enough to hold the sour cream
layer, but not rigidly so. Pour the sour cream topping over the cheesecake and cook for a
further 10 minutes.
7. Carefully remove the tray from the oven and take the springform tin out to cool. When it has cooled to room temperature place it in the fridge to chill it before unmoulding. It
should shrink away from the sides of the tin slightly – if not, run a sharp knife around the
edge before releasing the spring.

chck 3

So that’s it – my favourite cheesecake. My friend Kara would like to try a choc mint
cheesecake, so one day I am planning to try this recipe but with an Oreo base, mint
flavoured filling (maybe with chocolate chips in it), and either a chocolate drizzle topping or chocolate shavings on top – or maybe even both.

Update – this is the choc mint version just before cooking:

chck 4

Crustless Mini Quiches

cmq

These mini quiches are lower in carbohydrate content and dairy casein than regular quiches. They use ricotta which has hardly any casein protein in it and little mature cheddar for some extra cheesy flavour. I baked mine in a larger size muffin tray, but you can make them mini muffin size or regular muffin size and reduce the cooking time slightly. Cooking times vary from oven to oven, but you know they are perfect when they are just very slightly wobbly in the centre.
They are ideal for a quick brekkie, and if you don’t have muffin cases, you can use squares of baking parchment and scrunch them into the muffin tray indents.
Other than the cheese, you can put whatever you like in them. I dry fried some bacon, mushrooms and onion and added it before baking them, but you can use anything. Here are some suggestions:

broccoli
peas
sun dried tomatoes
cauliflower florets
spinach
prosciutto
small pieces of sausage
capsicum
pieces of butternut pumpkin

Just make sure that all of the extra filling ingredients are cooked or partcooked beforehand so that you don’t get any raw veg or meats in your quiche!

Ingredients (makes 4 large muffins):
Mixed pre-cooked filling – see above
3 eggs
salt
pepper
1 teaspoon mixed herbs (dried) e.g. basil, sage, oregano, thyme, mint, coriander
I used a standard dried herb mix, but you can also use fresh or choose the herbs separately
50-70g ricotta cheese (depending on how much you like it and how much filling you have)
approx. a third of a cup of finely grated cheddar

1. Mix together the eggs, salt, pepper, herbs and ricotta – give it a good whisk with and electric whisk to make it as light as possible. The mixture might look a bit strange, but it will turn out fine.
2. Stir in the pre-cooked filling and most of the cheese – save a little cheese for on top.
3. Place mixture in muffin cases and sprinkle extra cheese on top.
4. Bake at 190 deg C for approx. 20 – 25 minutes.

Prawn Puri

Have you ever tried prawn puri as a starter in an indian restaurant ? The puri does not refer to a ‘puree’ i.e. mashed food, but is the name of an indian bread which is flat and lightly fried – also called poori in some regions.

This picture shows prawn puri with dhal, raita, and salad.
prawn puri

It is remarkably easy to make.
For the puri bread you need 2 1/2 cups of chapatti flour (low gluten atta flour) and one cup of water. Mix them together to form a dough, knead the dough, then wrap it in cling film and leave it in the fridge for at least 2 hours. You can leave it for a few days if you want to make it in advance. Knead it again and divide it into 6 portions. Roll each portion into a round and fry lightly in a frypan which has been lightly greased with some vegetable or peanut oil. If you like them buttery, you can butter the breads while they are still hot.

For the prawn bhuna you need:
½ tsp red chilli powder
1 tsp coriander powder
½ tsp cumin powder
½ tsp turmeric powder
½ tsp garam masala
1 tsp green masala paste
2 onions
3 tbsp tomato paste
approx 6 large raw prawns per person with shells removed

1. Blend one onion until mushy. Chop the other one into small pieces and fry it in oil and butter until soft.
2. Put the dry spices in a large pan and add 1 tablespoon oil. Add half a cup of hot water. Cook to reduce the water by half.
3. Add the green masala paste, tomato paste and mushy onion to the spice mixture.
4. Cook for 10- 20 minutes until the’ rawness’ of the onion has dissipated.
5. If the onions still taste hot, add half a teaspoon of sugar and stir well.
6. Add the fried onions and cook for a further 5 minutes.
7. Peel the prawns and rinse them. Stir the juice of half a lemon (or a whole lime) into the prawns, leave for a while to marinate, then when ready to serve add them to the curry sauce. Stir in some fresh coriander.

To assemble the prawn puri, place a puri on a plate, and spoon prawn bhuna over the top. If you like you can add some minty yoghurt sauce, onion salad or cucumber raitha. I often serve mine with some dhal. You can also serve the curry with chicken, crab, or vegetables instead of prawns.

Raw Coconut Lemon Blueberry Balls

I have often seen raw food balls in the cafes that I frequent and they are quite expensive, often costing around $4 each.

balls

I am currently on a muscle strengthening plan and I have to eat protein every 3 hours throughout the day. Not wanting to eat huge amounts of meat every day, I decided to have a go at making these balls to give me a protein hit and to stave off mid morning and mid-afternoon hunger pangs. They are incredibly easy to make, very quick and they taste really good.
I also added some cacao powder to mine which I had in the cupboard, but it’s optional. You can also add things like chia and oats if you like, or try different nut varieties.

Ingedients:
30g Cacao powder (optional)
One and a half cups of cashews
Half a cup of shredded or desiccated coconut (plus extra for rolling)
Half a cup of dried blueberries (I found these in Coles with the home baking goods, but I am sure you can use fresh blueberries too)
Three quarters of a cup of fresh dates, chopped
1 lemon, you need the zest and at least half the juice
Half a teaspoon of vanilla essence
Stevia sweetener or raw brown sugar (optional)
A generous pinch of sea salt

Method:
In a food processor, whizz up the cashews, coconut and blueberries. Pour them into a bowl.
Put the dates and cacao in the food processor and whizz them up. Add them to the bowl.
Add half the lemon zest, half of the lemon juice and the salt and vanilla. Mix well and taste the mixture. Add more lemon juice if necessary. If you need it to be sweeter you can also add some Stevia sweetener or a teaspoon of brown sugar.
Using a spatula, mix the ingredients together until they bind into a dough.
Place some desiccated coconut and the rest of the lemon zest in a separate bowl – mix them well.
Now make small balls with the mixture (approx the diameter of a 50p or 50c piece, but it doesn’t matter if they are bigger or smaller). Roll the balls in the coconut/lemon mixture to coat them and store them in an airtight container.
This made about 14 balls but the exact quantity depends on the size.

Awesome Fried Chicken

I don’t have junk food very often, and when I do I am always a bit disappointed. It really is quite easy to make at home and tastes much better, and you know what goes into it – there are no nasty chemicals or preservatives. I have always wondered what the secret herbs and spices are in KFC, and I set about attempting to make the best home-made fried chicken.
This is the recipe that I came up with and it was really really good – I would have liked a bit of chilli, so I have added chilli as an optional ingredient. You can use either whole pieces of chicken leg, thighs, wings or breast, or you can make nugget sized pieces. If you want to minimise the frying time, you can always poach the chicken in advance (poach it in a nice flavoursome stock), and then you just need to fry it until the batter is nicely brown.

awesome fried chicken

This is enough batter to coat nuggets from 2 large chicken breasts – will serve 3 or 4 as a main course:

Half a cup of chickpea flour
1 cup of self raising flour
1 teaspoon of garlic salt
1 teaspoon of onion salt
1 teaspoon of powdered onion flakes
Half to 1 teaspoon of chilli or curry powder (optional – for the heat lovers)
1 1/2 tablespoons of caster sugar
Half a teaspoon of ground pepper
Half a teaspoon of smoky paprika
Half a teaspoon of cumin
Half a teaspoon of nutmeg
1 teaspoon of oregano
1 teaspoon of sage
1 teaspoon of thyme
1 teaspoon of ginger powder or grated fresh ginger
With the herbs you can use fresh or concentrate if you don’t have dried.

Method:
1. Mix all of the above ingredients together in a bowl.
2. Add 200mls of water (you can use cold soda water if you want a lighter batter). Mix well. The batter will be quite thick and gloopy – this is good as it will stick nicely to the chicken. It should be a thick dropping consistency so if you lift your spoon up it will slowly slide off the spoon. If it doesn’t slide at all, add a little more water.
3. Chop your chicken (raw or pre-poached) into the desired portion sizes.
4. Coat with batter.
5. Fry in approx 1-2 inches of hot oil – time depends on the size of the pieces. My nuggets took about 4-5 minutes. Turn frequently so that they cook evenly.

Serve with anything you like – I like the following options:

  • salad
  • corn
  • peas
  • home made potato wedges
  • fresh mayonnaise
  • tomato sauce
  • chilli sauce
  • chilli mayo

See my recipe for super quick mayo here

Super quick fresh mayonnaise

All you need is a stick blender and you can make mayonnaise in seconds. It is so ridiculously easy that you will probably never buy mayo again because this method is simple – you can make it fresh every time.

mayo

You need the tall plastic beaker that comes with your stick blender, and the important thing to remember is to put the oil in last so that it covers the other ingredients.

Place the following in the plastic beaker:
1 egg (without the shell)
a generous pinch of salt
a twist of pepper
1-2 teaspoons of Dijon mustard
1 tablespoon of either lemon juice or white wine vinegar (this is your acidic ingredient)
200ml of light oil (vegetable oil or light extra virgin olive oil)

Now use a stick blender to blend the ingredients – in approx 20 seconds you will have mayonnaise. Adjust the seasonings – you can add more of any of the ingredients if required.
If it seems too thin add more oil – this may seem like a strange thing to do but a touch more oil will thicken the mayo.

You can also add other seasonings – herbs, garlic, spring onions, wasabi, capers, horseradish, mint, paprika, garam masala are a few suggestions.

You can make a nice version of Tartare sauce by adding capers and a finely chopped gherkin to the mayo.