It Just Has To Be Delicious

Archive for June, 2020

Bhuna Sauce

I made an epic prawn bhuna the other day and I’ve had a few people asking me for the recipe, so here it is. It doesn’t have to be a prawn bhuna, you can make it with any meat, or tofu, vegetables, paneer (Indian cheese) for vegetarian/vegan options.

bhuna

I make mine dairy free, so I use coconut yoghurt or coconut cream instead of usual yoghurt, but if you don’t mind dairy, feel free to use lovely thick Greek yoghurt. I also use fresh tomatoes because the produce here in Perth is outstanding, but feel free to use tinned tomatoes if you wish.
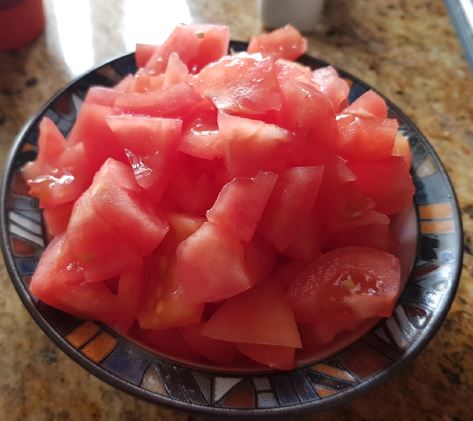
This is how I skin and prepare my tomatoes – it’s quick and easy and by the time you have chopped your onions and garlic, the tomatoes will be ready to peel. I boil the kettle, and with a sharp knife I cut a shallow cross in the top where the stem was and again on the opposite side. Then I place them in bowl of boiling hot water for about 5-6 minutes.

bhuna 2

Be careful when you remove them because they’ll be hot. The skin should come away easily just by rubbing it slightly, if it doesn’t then they need a bit longer.

bhuna 3

I also remove any thick inner stem and the fibrous part where it attached to the plant. For this recipe I also remove most of the watery seedy part so that the final product is chunks of skinless tomato flesh.

bhuna 4

This recipe is enough to serve 6 people, you can also freeze portions of sauce to use later then you can add fresh chicken, vegetables, or prawns on the day that you serve it.
Ingredients:
a quarter of a teaspoon each of:
coriander seeds
cumin seeds
fennel seeds
black mustard seeds
2 onions (chop one and a half of them and puree the other half in a blender)
2 teaspoons of garlic (either crushed or pureed with the onion puree above)
2 teaspoons of fresh grated ginger (or from a tube if that’s more convenient)
4 large ripe tomatoes
1 teaspoon of turmeric powder
2 teaspoons of chilli paste (or 1 teaspoon of chilli powder)
4 teaspoons of medium curry powder (I use Clive of India but choose your favourite brand or make your own)
300mls of chicken or vegetable stock
2 generous heaped dessertspoons of Greek yoghurt or coconut yoghurt or approx (150-200ml coconut cream)
4 tablespoons of tomato puree
2 teaspoons of garam masala
oil – vegetable, groundnut or something else with a mild or no flavour
salt and pepper

1. Get everything chopped, pureed, and ready:

2. Heat 3 tablespoons of oil in a large pan and add the whole seeds.

bhuna 7
bhuna 8

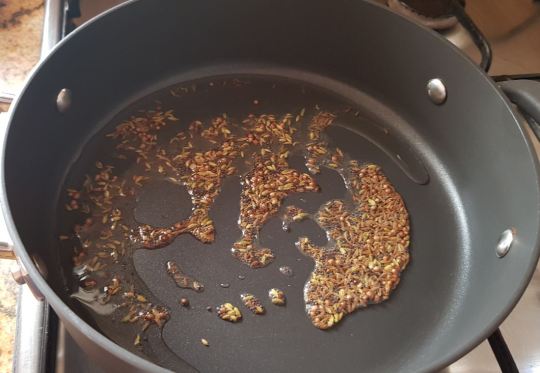
3. Once you hear them pop and crackle, add the onions, ginger, and garlic and stir to coat them in the spicy mixture.

bhuna 9

4. Once the onions start to soften, add the turmeric, chilli, and curry powder.

bhuna 10

5. Give everything a good stir, cook for a few minutes, then add the tomatoes and tomato puree

bhuna 11

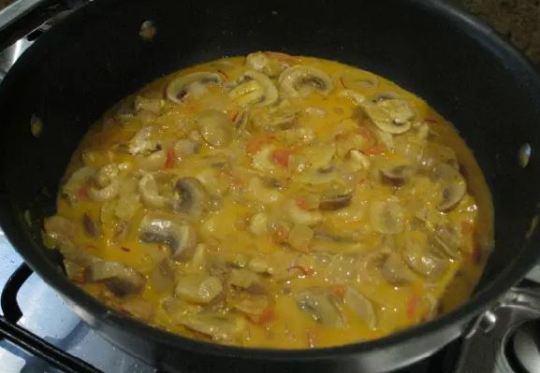
6. Cover and cook for approximately 10 – 15 minutes then stir in the yoghurt and the garam masala. The garam masala will make the sauce take on a brown colour. Once the tomatoes and onions are soft and a bit mushy, turn the heat off and leave the sauce covered to cool down in the pot. Add salt and pepper to taste. If it’s too spicy, add a little sugar to balance the spices. Freeze in appropriate portion sizes.
7. If using the same day, reheat the sauce and add the protein of your choice e.g. raw prawns, chicken, lamb, tofu, veggies and cook until the protein or veggies are cooked through. I used lovely fresh large raw jumbo tiger prawns and they were delicious.
8. Bhuna tends to be quite a dry curry, so use as much sauce as you like that suits your needs. I prefer more gravy so I tend to be quite generous with the sauce. If you reheat it uncovered, you can reduce the sauce if you prefer a thicker, richer flavour.

Mushroom Bhajee

mb 1

500g mushrooms (I use the white round mushrooms, but you can use any)
1 teaspoon black mustard seeds (Rai)
1 teaspoon cumin seeds (Jeera)
2 large teaspoons green masala paste
1 tablespoon dhania/jeera powder (see above)
1 onion chopped medium fine (however you like it)
2 tomatoes chopped and peeled (optional)
1 teaspoon turmeric (Haldi)
2 tablespoons butter or non-dairy spread (optional)
oil such as sunflower, peanut
1 bunch fresh coriander, chopped

1. Heat about 2 tablespoons of oil in a large pan, and add the black mustard seeds and cumin seeds. Fry quickly for a minute or two – they will crackle, and this initial spice/oil mixture is called a ‘vagaar’.
2. Fry the onions in the vagaar, until they begin to soften slightly, then add the green masala paste, dhania/jeera and turmeric.
3. Now add the mushrooms and mix well to coat them with spices. Put a lid on the pan.
4. After approx 5 minutes, add the tomatoes (if using), butter, stir in the coriander leaves and cook on low for a further 5 minutes or until the mushrooms are soft.
5. Taste, and add salt, pepper and a sprinkle of garam masala if needed. There should be enough to serve 4 people as a side dish.

mb 2

Indian Food

Today I made a mushroom bhajee. I wanted something to go with a home made curry in the week, and I usually make a vegetable mix of spicy cauliflower and potatoes, but I fancied mushrooms and was thinking of how I could reproduce the lovely buttery mushroom bhajee from UK takeaways that I know and love. My Indian friends will be laughing at me now, wondering why I need to have veg to go with my curry – they tend to have meat curry and rice or veg curry and rice, and think it strange that I want to have meat curry with a veggie side and rice. It’s just what I am used to though – my idea of a balanced meal is some protein, some veg and some carbs.

Because I love indian food so much, there are some basic things that I have in my house:
1. A Braun multiquick blender – ideal for whizzing up curry pastes. It comes as a set with lots of attachments:
br 2

This is the attachment that I use for my pastes:

br 1

2. A cheap coffee grinder which has never seen a coffee bean – freshly ground spices are so much better than preground. If you get used to grinding your own spices, you will be making your own curry powders and garam masala, and you will love the aroma. You can buy an expensive one if you like, but I got a cheap one in Kmart for around $15:
cg
When I have finished grinding spices, I wipe out as much residue as I can and then grind some plain dry rice to clean it and pick up the last bits of spice.
3. A supply of green masala paste in the fridge – this paste is so versatile, I use it to make everything from curries to veggies, and you can even mix it in with basics like beans on toast and scrambled eggs to give them a touch of spice 4. A pot of dhania/jeera – this is coriander and cumin in a nice proportion,
roasted, ground and ready to use
5. Good curry books like Madhur Jaffrey recipes and Ramola Parbhoo’s ‘Traditional Indian Cooking’.
6. Plastic pots with snap-on lids to keep your spices in – spices degrade quickly in non-air tight containers, and I love the plastic ones – I just write the name of the spice on them in marker pen, and wash the writing off when the pot is used up.
Here are the recipes for the green masala paste, and the dhania/jeera.
There will be more Indian recipes to come – this is just a few store cupboard staples to get you started.

Green Masala Paste
100g green chillies stalk removed – you can remove some of the seeds if you prefer it less spicy
40g garlic peeled
50g fresh root ginger, peeled
1 tablespoon sunflower oil
1 teaspoon salt
a pinch of turmeric
Blend all of the ingredients together in a food processor (I use my Braun multiquick) until you have a lovely green paste – doesn’t it smell good ? Transfer it to a suitable size jar or tub, press it down a little so that the surface is even, and pour a little oil on top. Store in the fridge.

Dhania/Jeera
65g coriander seeds (dhania)
35g cumin seeds (jeera)

Learn the indian names of spices – it helps when you are in the indian supermarket.
Gently roast the spices in a dry frypan over a low heat for 2 minutes. You should smell the aroma. Transfer them to a coffee grinder and grind them until you have a medium coarse mixture. Store in an airtight container.

Peking spare ribs

Chinese restaurants offer various varieties of spare ribs. Barbecue ribs seem to be the most popular, but you can also get the drier spiced salt ribs, ribs in plum sauce, or Peking spare ribs (sometimes called King Do). In restaurants the Peking ribs are usually coated in an orangey-brown sticky sauce and have a unique flavour of sweet and sour richness with a warm spicy background.

ribs

The recipe for the ribs is fairly straightforward, but you need to plan ahead because they take a lot of marinating and cooking time. Whether you buy beef or pork ribs, get the best quality you can with a nice amount of meat on them.
Quantity – I served two racks of ribs between 6 people as an interim course between starter and main. It looked like quite a lot of ribs and was a large serving, but they all disappeared fairly quickly. If your ribs are long you can chop them in half with a meat cleaver to get extra portions. As a starter you should probably allow 2-3 ribs per person.
Wash your ribs before marinating, pat them dry with kitchen paper, and divide them up so that they are easier to manage. Make sure that you remove the tough membrane (if there is one) because it doesn’t taste nice.

Marinade recipe (enough for two racks):
250mls vegetable stock (either from stock cubes, powder, a carton or freshly made)
5 tablespoons of brown sugar
half a teaspoon of five spice powder
4 cloves of garlic, minced or grated
1 teaspoon of finely grated ginger
4 tablespoons of light soy sauce
2 cups of tomato ketchup (I used Heinz)
2 tablespoons of Hoisin sauce
1 tablespoon of rice wine vinegar
60-80mls red wine (optional)

1. Mix all of the marinade ingredients together in a large bowl and marinate the ribs for at least 24 hours, I marinated mine for 2 days in the fridge, the bowl covered with cling wrap.
2. The next stage is to boil them. You don’t have to do this but it really makes them tender, so I definitely advise it. Pour the ribs and marinade into a large covered saucepan and bring them to the boil, then simmer them for 15-20 minutes.
3. Next prepare a large baking tray – for ease of cleaning I lined mine with foil and then placed baking parchment on top of the foil – this avoids the result of gooey bakeware which needs soaking to remove the sticky residue.
4. Place the ribs in the tray, make sure that each one is coated with marinade but not swimming in it. Loosely cover the tray with foil and roast in a preheated oven at 180-190 deg C for 70-90 minutes. The longer you cook them the more tender they will be. The meat should fall away from the bone quite easily.
5. Add honey to the remaining marinade (I added about 6 tablespoons) and baste them with fresh marinade about every 15 minutes during roasting. You can remove the foil cover 15 mins before the end of cooking.
6. Once they are done, you may wish to garnish them with sesame seeds and chopped spring onion before serving.
Serve with good wine and good company.

Mango and Lime Chicken

mlc

This is a nice way of making Nandos style chicken. In Australia we can’t get the mango and lime basting any longer, so I make my own.
The chicken is better if marinated for 2 days, but you will still get some nice flavours after an hour of marination. Buy enough chicken to feed your guests – you can buy it as portions, but I prefer to buy a whole free-range chicken and joint it, because it tastes nicer if the bones and skin are still intact.
Once you have your chicken jointed, place it in a large bowl. There are a few ways of making the marinade, you can use either fresh or tinned mangoes, or mango chutney. The quantities may vary depending on how sweet you like the result, but half a fresh mango, 2 tablespoons of mango chutney or half a tin of mangoes should be enough for one chicken.
Then you will need the juice of 2-3 limes. If using fresh or tinned mangoes, chop them into small pieces and mash them a little with a fork. Start by adding the juice of a lime and taste it. If it tastes sweet, add the juice of another lime. It seems to sweeten up a bit during the marinating process so err on the side of slightly sour rather than slightly sweet. Now add a pinch of salt and a spoonful of chicken stock powder to the marinade and spread it over the chicken pieces. Cover the bowl with cling film and place it in the fridge, turn the pieces regularly – if you are marinating them for a few days, turn them twice a day to make sure they get a good coating.

On the day you are cooking, set the oven to 180 deg C. Take enough potatoes for your guests – I allow a large potato each and cut your potatoes into chip sized pieces. You can do wedges if you prefer. I leave the skin on because it tastes nice and I can’t be bothered to peel them.
Toss the potatoes in a little olive oil, salt and pepper, and bake them in a baking tray – they will take around 30 minutes depending on how good your oven is, and the chicken will take about 40 minutes, so put the spuds in first, then after 10 minutes put the chicken in. I put my chicken and chips in trays lined with baking parchment or foil to save on washing up. Make sure that the chicken is nicely coated with the marinade.
If using spray oil for your chips – a word of caution – don’t spray it on your best non-stick pans. The aerosol in spray oil damages the Teflon coating. I found this out to my cost when I used it on two of my beautiful Circulon fry pans.
You can also use sweet potatoes, but they will not take as long as regular potatoes, so put them in at the same time as the chicken and cut them into large chips.
While the cooking is happening, make the chip salt by mixing the following:

1 tablespoon of onion powder (I ground up some dried onion flakes) do not use onion salt it is too salty
1 tablespoon of smoked paprika
1 teaspoon of ground coriander
half a teaspoon of cumin
quarter to a half teaspoon of chilli depending on your spice tolerance
a quarter of a teaspoon of allspice
a quarter of a teaspoon of salt
a quarter of a teaspoon of pepper

Mix the spices together – you can double up these quantities if you have a lot of chips.
When the chips are done sprinkle them with the spice mixture.
Serve the chicken and chips with buttered sweetcorn and peas.
If you want to make perinaise chip dip, add a dash of tabasco or chilli paste to some mayonnaise.

Loh Bak

I had my first taste of Loh Bak at a wonderful little canteen style Malaysian restaurant in Malaga called “Sense Lah”. It was one of those little gems of a restaurant owned by a guy from Penang called Patrick who had a hearty asian laugh, and one day Patrick pointed out that he was the only Malaysian restaurant in Perth that served Loh Bak, so I tried it and I was hooked.
I have made Loh Bak at home a few times, and this recipe is very good, but I will always fondly remember Patrick’s version – unfortunately for me he has now retired and Sense Lah has closed.
The dish consists of a mixture of minced pork, prawn, carrot, water chestnuts and seasoning in a beancurd wrapper and then steamed and deep fried. The hawker stalls in Asia sell it on stalls where you go and choose your items from a vast display, then they deep fry everything for you, slice it up and give you some sauces – look out for stalls selling it as Ngoh Hiang.

lb 1

lb 2

Recipe
200g raw prawns deveined
250g minced pork
3 tablespoons grated carrot
6-8 water chestnuts finely chopped
2 tablespoons coriander leaves finely chopped
2 spring onions finely chopped
1/2 teaspoon five spice powder
pinch salt
1 tablespoon light soy sauce
1 egg beaten
1 pack of dried beancurd skins (available at chinese supermarkets)
1 teaspoon corn flour

Method
1. Mix together all of the ingredients except for the beancurd skins and cornflour. While the mixture is standing, cut the beancurd skins to a uniform size – they will have ragged edges – cut them to approximately 15cm squares. Mix the cornflour with a tablespoon of water to make a thick paste.
2. To make a roll, take one of the squares of beancurd skin and wipe it with a new damp clean cloth to soften it slightly. Put 2 tablespoons of mixture in the corner of the skin and roll it up tightly towards the other corner, tucking in the sides as you go. brush some of the cornflour mixture on the edges to ‘glue’ them together otherwise it will burst open in the hot oil.
3. Continue making rolls until all of the mixture is used up. You should be able to make approximately 10 rolls.
4. Steam the rolls in a steamer to cook the filling – approx 10 minutes.
5. Heat oil in a deep fat fryer to 180 deg C. Fry the rolls for 3-4 minutes each until golden.
6. Serve with a dipping sauce such as sweet chilli, hoisin, or make your own with fish sauce, lime, sugar and chilli.

Jaffa chocolate brownies

br 2

Another variation on the brownie theme is the orange flavoured brownie. I first tasted one of these at Mooba coffee bar when it used to be in Subiaco, and it was very memorable. This recipe is enough to fit in a standard loaf tin.

Ingredients
100g butter or dairy free spread
100g of dark chocolate such as Lindt 70% or 80%
the zest of an orange (pick a nice deeply orangey coloured one, not a pale one)
2 eggs
150g sugar
50g plain flour
a pinch of salt
25g cocoa powder
50g of chopped orange flavoured chocolate such as Lindt Orange Intense

br 3

Method
1. Line a loaf tin with baking parchment and set the oven to 180 degrees C.
2. In a small saucepan gently heat the butter or spread, chocolate and orange zest to melt it. Once melted, cool it slightly but don’t let it go too stiff.
3. In a bowl whisk the eggs and sugar until the colour goes pale and the volume doubles.
4. In another bowl sift and mix the flour, salt and cocoa together.
5. Add the cooled melted chocolate to the whisked egg and sugar mixture, keep whisking as you add. If the chocolate is too hot, the eggs will scramble, so make sure that the chocolate mix is cooled as much as possible without going stiff.
6. Stir in the flour, salt and cocoa mixture.
7. Stir in the chocolate orange pieces.
8. Pour the mixture into the loaf tin, tap the tin to make sure that the mixture gets to the corners.
9. Bake for approx 35-40 minutes. It should be slightly gooey in the centre.

br 1

Once cool(ish) slice into pieces and share with only your very best friends.


Dairy free chocolate brownies

brownie

I didn’t know if dairy-free chocolate brownies would taste okay, but I made them today and they were rather good.
The dairy item in a ‘normal’ brownie is butter, I replaced the butter with a vegan spread called Nuttelex – which is just emulsified olive oil.

Recipe:
75g plain flour
half a teaspoon of baking powder
a quarter of a teaspoon of salt
160g fine dark chocolate (I used Lindt 70% which is dark enough to be classed as vegan and dairy free)
200g Nuttelex or other non-dairy spread
4 eggs (or equivalent egg replacer if vegan)
220g brown sugar (this is half the amount that the original recipe recommended!)
1 teaspoon of vanilla essence

  1. Line a 8 inch (20cm) square cake tin with baking parchment and heat the oven up to 170 deg C.
  2. Melt the chocolate and spread in a double boiler or a glass bowl over a saucepan of gently simmering water – don’t let the water touch the bottom of the bowl.
  3. Meanwhile whisk up the eggs, sugar and vanilla in another bowl until foamy and creamy.
  4. Mix the flour, salt and baking powder together in a separate bowl.
  5. When the chocolate and spread has melted, leave it to cool for a while (but don’t let it go hard) about 5 minutes.
  6. Stir the chocolate mixture into the whisked eggs and mix well. Use a spatula to scrape all ofthe chocolatey mix out – don’t waste a drop.
  7. Now fold in the flour/salt/baking powder gently until it is all combined.
  8. Pour the mixture into the baking tin and bake for approx 35-40 minutes. When done it should be crispy on top, but gooey in the middle although a skewer should come out clean.

Mmmmm – serve warm with a nice cup of tea.

Overnight Oats

oo

Overnight oats are so quick and easy to prepare and very adaptable to suit your own preferences. You can use any milk or combination of milks that you like, any fruits, you can add flavourings and sweeteners to suit your diet.
All of my overnight oats start with a basic recipe of half a cup of breakfast oats (this is one serve). Oats are relatively gluten free but they can contain traces because they tend to be manufactured in the same places as gluten cereals. If you are really allergic then buy gluten free oats. I then add approx 1 cup of milk. I tend to mix soy and almond milk, but you can use any milk – cow, goat, rice, coconut etc. You can also add yoghurt for a thicker consistency. I add a teaspoon of chia seeds – you can add more if you wish, but chia can be calorie rich so keep an eye on what you are adding.
I then add something to spice it up a bit like cinnamon or mixed spice. Give it a good stir because cinnamon doesn’t really dissolve in the milk. You can also add any supplements like whey protein, spirulina etc., seeds, or dried fruits like dates, apricots, sultanas, mixed peel.
My next addition to the pot is two types of chopped, sliced, or grated fruit. My favourites are grated apple (wonderful with cinnamon), pear, fresh raspberries, strawberries, blueberries, white peach and banana but you can use any fruits you like. The berries tend to be lower in calories than other fruits.
If you prefer sweetener, add a little sugar or some maple syrup, agave syrup or honey, but it really shouldn’t need any. Give everything a good stir, make sure the chia hasn’t clumped, and make sure that the oats are coated in the milk.
You can make a huge portion in a bowl and store it in the fridge, but I prefer to make individual portions in mason jars. Leave them in the fridge overnight and then they are ready to serve in the morning. I eat mine cold, but you can warm it up in a microwave or saucepan if you prefer. Couldn’t be easier.

oo 2

Lemon Cake

lc

I do love a lemon cake, and this recipe makes a lovely light lemony sponge. The amounts for the frosting are approximate because I add and taste as I go along.
Set the oven to 170 deg C and grease and prepare two standard cake tins. I like to put baking parchment in the base and I tend to use springform tins because its easier to pop the cakes out once they’re done.

Ingredients:
Cake:

170g butter (or Nuttelex Buttery or other vegan butter/substitute if you are dairy free)
200g caster sugar
4 eggs beaten
320g plain flour
4 tablespoons of cornflour
Half a teaspoon of salt
One and a half teaspoons of baking powder
1 cup of milk (you can use soy, almond, coconut, or a mixture if you are dairy free)
A quarter of a cup (60 mls) of vegetable oil (don’t use olive oil – it will taste too olivey)
The zest of 2 lemons and 60mls of lemon juice (wash the lemons before zesting them)
Frosting:
Approx 150g of butter or non-dairy substitute
Approx 125g (1 cup) of icing sugar (powdered sugar)
Zest of 1 lemon plus some of the juice (see method)

Method:
1. Set the oven to 180 deg C (or 175 fan assisted).
2. Using an electric whisk, whisk the butter and sugar until light and creamy (2-3 minutes).
3. Add the eggs and whisk again for a minute or two.
4. Stir and fold in the dry ingredients – flour, cornflour, salt, lemon zest and baking powder.
5. Stir in the wet ingredients – milk, lemon juice, and oil.
6. The batter should be fairly liquid rather than thick . It’s okay if it is a little bit lumpy, but try to smooth out any big lumps.
7. Pour the batter into the prepared tins.
8. Bake for approx 20-30 minutes, but check them after 20 minutes. When they are lightly golden brown and a skewer or fork comes out of the mixture clean – they’re done.
9. Leave them for 5 minutes, then take the cakes out of the tins and cool on a cooling rack.

Frosting:
1. Using an electric whisk, whisk the butter or substitute until light and creamy.
2. Add the icing sugar slowly – it should thicken up.
3. Stir in the lemon zest.
4. Add some of the lemon juice and whisk again. Keep adding the lemon juice until the frosting is spreadable but not too runny. If you add too much lemon juice, add more icing sugar to thicken it up again. Taste the frosting to make sure it tastes good and isn’t too greasy or too acidic – adjust the sugar and lemon juice as required. If too lemony, you can always add water instead of juice to make it looser.
5. Place the base of the cake on a suitable plate or stand (you can line it with baking parchment if you like).
6. Spread half of the frosting in the middle of the cake and sandwich the halves together.
7. Spread or pipe the rest on top of the cake.
8. Put the kettle on… it’s tea and cake time !