It Just Has To Be Delicious

Archive for the ‘Recipe’ Category

Apricot Sesame Balls

apricot sesame balls


These power packed balls are really soft and succulent, you can vary the ingredients to suit your taste, but mine are laced with warm Christmassy spices that are a nice contrast to the sweet apricots. This recipe makes approximately 10 ‘mouthful sized’ balls.
 
Ingredients (all approximate – adjust them to suit your own taste):
70g Dried apricots whole or shredded
Half a teaspoon of ground cinnamon
Half a teaspoon of ground nutmeg
Half a teaspoon of ground cardamom
Sesame seeds for coating (approx 15g)
1 cup of muesli of your choice – blitzed to make it finer in a food processor – not quite powder, but no big lumps

Method:
In a small saucepan simmer the apricots with a quarter of a cup of water and the
cinnamon, nutmeg and cardamom until the apricots have softened (about 12-15 mins), add a little more water if they look dry.
Cool the apricot mixture to room temp, then stir it into the muesli to make a soft paste.
Roll the paste into balls and roll them in sesame seeds. If the paste is a little dry add some more water, if it is a bit too moist, add some more muesli or some ground nuts.
Simple ! Enjoy.

VBW Pasta

vbw pasta

We recently stayed in a holiday apartment in Spain, and it can be quite a mission to make tasty home cooked food without buying hundreds of condiments from the local supermarket.
This is a simple pasta that we made without cooking oil, and it was enough to serve four people. It also took just 4 ingredients from the local supermarket: a jar of mixed antipasti (eggplant, capsicum and onion), a jar of napoletana sauce, some sliced hot chorizo, and some pasta.

First we started to cook the pasta in boiling salted water. Then we cooked the chorizo on a low heat to render some of the fat. We chopped the antipasti and added it, then poured in the napoletana sauce. Once the pasta was cooked, we drained it and added it to our hotchpotch of sauce and mixed well. It was really tasty and didn’t cost the earth.

Chocolate Peanut Butter Stack

cps 2

cps 1

The inspiration for this cake recipe comes from a similar item that I had in Starbucks in Singapore a few years ago. The Starbucks version was yummy but also sickly sweet, and I was reminded of it when a friend at work asked me to make a cake with nuts in it.
Originally I thought of making a coffee and walnut cake, but then I thought why not try the stack ? I haven’t made a many layered creation like this before, so I knew it would be a worthy challenge.
I used an 8 inch square (20cm) cake tin with a removable bottom. I am sure it can also be made with a round tin and served as wedges, but I think that the rectangles look nicer. I lined the tin with baking parchment in both directions so that when the cake was done, I could lift it out with the parchment. This makes it adaptable to a square tin without a removable bottom too.
Make the chocolate cake a day in advance. Like bread, it is much easier to slice if it is not fresh out of the oven. I sliced my cake into three horizontal slices, but on reflection, maybe I should have used 4 slices. Use your favourite chocolate cake recipe, the darker the better.
If you go for a packet mix, choose one without filling and frosting, and preferably one that uses oil as an added ingredient. Vegetable oil will make the cake very moist.

I also made my caramel a day in advance – I chose to make dulce de leche, where you simmer a can of condensed milk (just place the whole tin in the water, don’t open it) for 3 hours. This is a fairly simple method, just check to make sure that it doesn’t boil dry.
Use the same baking tin to assemble the cake – I re-lined mine with parchment for ease.

I made the base from digestive biscuits and melted butter – like a cheesecake base. You can use dark choc biscuits if you like, but I thought that oaty digestives would give another texture. You need approximately half the weight of butter to biscuits e.g. if using 150g biscuits, melt 75g butter. Whizz up the biscuits to crumb consistency using either a food processor or by bashing them with a rolling pin while they are in a plastic bag. Slowly mix in the butter and line the base of your tin with the mixture – use the base of a glass or cup to push the mixture down – push it into the corners, then put the whole tin in the fridge so that the base sets more firmly as the butter hardens.
Next slice the cake so that it is ready to layer – be careful because each layer will be quite flimsy – you can put parchment between the layers if it helps to lift them.
Now make the mousse and buttercream – each amount should make enough for two layers.

Chocolate mousse:
200g dark chocolate (70% at least)
1 1/2 cups thick cream
2 tablespoons of icing sugar

Using an electric whisk, whisk the cream and icing sugar in a chilled bowl preferably until the cream is stiff rather than runny. While you are doing this, melt the chocolate in a bowl over a double boiler.
Once the chocolate has melted, fold half of the cream into it, it might go a bit stiff and claggy at first, but keep folding and it will smooth out. Then fold in the rest of the cream until it is an even consistency.

Peanut buttercream:
1 cup unsalted butter – soft
1 heaped cup of smooth peanut butter
2 cups of icing sugar sifted
1/2 cup thick cream
a pinch of salt

Using an electric whisk, whip the butter and peanut butter until light and fluffy. Next whisk in the icing sugar. Now whisk in the cream and salt – if it is too stiff to spread, add a little more cream.

When I assembled my cake, I placed choc mousse over the biscuit base, followed by a layer of cake, followed by a layer of peanut butter cream, followed by a layer of cake, then a layer of mousse. I carefully placed some peanut butter cream on top of the mousse (this is why I could have done with another cake layer), and finished off with a layer of cake. I lightly whisked the dulce de leche with a fork and spread that over the top with a spatula. Then I sprinkled salted peanuts on top. I placed it in the fridge for a few hours before removing from the tin and slicing.

cps 3

Bread pudding and Bread and Butter pudding

On a winter’s day there is nothing quite as satisfying as the smell of a bread based dessert coming from the oven. I remember as a child coming home from school to find that my mum had baked a bread pudding, fresh out of the oven, covered in glistening brown sugar, to be eaten later as dessert with custard and a cup of tea. I am not sure of the origins of bread pudding, but I imagine it was a wartime creation for using up leftover stale bread.
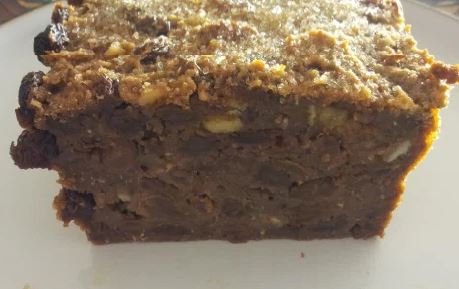
Before we continue, let’s discuss the difference between ‘bread pudding’ and ‘bread and butter pudding’. Bread pudding seems to be a British creation – it is dense and soft, full of currants, but not cakey, more like a soggy Christmas pudding, usually divided into small squares and sprinkled with sugar. You can’t eat lots of it in one go – it is pure stodge – but lovely comforting stodge at that. It is made by mashing stale bread with milk and dried fruit, and adding copious amounts of spice.

bread 1
Bread 2

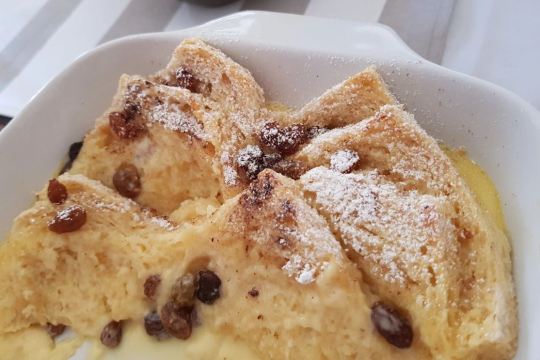
Bread and Butter pudding on the other hand is soft and custardy. It is made by arranging slices of buttered bread in a dish, pouring custard over the top and baking in the oven. The bread is usually cut into triangles so that the pointy bits above the custard go crunchy and maybe slightly burnt to contrast with the soft rich texture of the middle.

bread 4

Okay so lets make some puddings.

BREAD PUDDING RECIPE (use half quantities for a smaller pudding)
500g of (preferably stale) bread – wholemeal works best – cut the crusts off, but if you are short of the 500g you can throw a few crusts back in
500g sultanas (you can use mixed dried fruit, but sultanas are juiciest and they don’t have pips)
85g mixed peel
2 tablespoons mixed spice
Half a tablespoon ground cinnamon
600ml milk
2 eggs beaten
100g light brown sugar (plus a few tablespoons for sprinkling)
100g butter – melted
Optional extras: replace some of the fruit with – lemon zest, orange zest, glace cherries (wash the sticky coating off with very hot water), dates, walnuts, pecans etc.

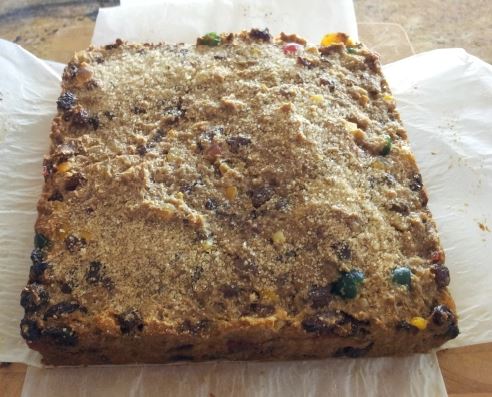
1. Heat the oven to 170 deg C. Line a 20cm square cake tin with non-stick baking
parchment. If using half the quantities above, line a standard loaf tin instead.
2. Tear the bread up into small pieces in a mixing bowl, add the fruit, spice, cinnamon and peel (plus any optional extras if you are using them). Pour in the milk and mix with a wooden spoon, mashing and mixing as you go so that the bread breaks down.
3. Add the eggs and sugar and stir. Stir in the melted butter. Leave to stand if necessary to allow the bread to soak up all of the ingredients.
4. Mix again and pour into the prepared tin. The large tin will take an hour and a half and the small tin will take just over an hour. If it is browning too quickly you can cover it with foil for a while.
5. Just before the end of cooking, sprinkle the pudding with sugar. When it is done a skewer will come out cleanly, but the middle will still be soft and moist. Serve warm from the oven with custard or cream or just a cuppa.

BREAD AND BUTTER PUDDING RECIPE

12 slices of bread with crusts removed
50g soft unsalted butter
8 egg yolks (save the whites for a pavlova)
150g caster sugar (plus extra to sprinkle on top)
4 drops of vanilla essence
300ml milk
300ml double cream
50g sultanas (as with the bread pudding, you can use raisins and currants if you like)
Ground nutmeg (up to a tablespoon depending on how much you like nutmeg)

1. Grease a pudding basin (approx 1.7 litres) with butter.
2. Butter the bread and cut it in half diagonally so that you get triangles.
3. Arrange the bread in the dish in layers, sprinkling with sultanas between layers and finishing with a final layer of bread. Arrange it so that some of the corners of the bread stick upwards – they will go crispy and create a nice contrast to the soft pudding.
4. Now make the custard. Whisk the egg yolks with the caster sugar. Place the milk and cream in a pan with the vanilla and heat gently until simmering. Pour the milk/cream onto the egg and sugar mixture and keep stirring (get a helper to stir while you pour).
5. Pour the custard over the bread and leave to soak while you heat up the oven to 180 deg C.
6. Fill a roasting tray halfway with warm water and place the pudding dish in the water (this is known as a ‘bain marie’). Sprinkle nutmeg on top. Cook for 20-30 minutes. It should be a soft wobbly custard, not firmly set. Sprinkle with sugar 5 minutes before the end of cooking so that it caramelizes on top.

Variations:
This is a very rich custard using 8 egg yolks and half cream, you can make a healthier version using fewer eggs and all milk, but if you are presenting this at a dinner party, I would recommend making the indulgent version. There are a variety of custard recipes available on the web, find the one that you like best.
To save time, you can use raisin bread and fewer (or no) sultanas. You can also add nuts, mixed peel, dates, dried apricots and glace cherries if you like them.
Other variations include spreading the bread slices with apricot jam, marmalade, or Nutella. You can also drizzle chocolate sauce over the servings. The options are endless.

Rich chocolate orange brownie

Many years ago I popped into Mooba coffee bar when it was in the heart of Subiaco, and had a jaffa brownie with my coffee. It was one of those brownies that was so memorable and delicious that I can still recall the flavour of it now. Today I decided to try and replicate it myself, so looked for a recipe and ended up with my variation on a few different recipes. My recipe is pretty much dairy free – there’s a little bit of milk in one of the chocolate bars, but it’s fairly small. It’s not vegan though because there are eggs in the mixture.

You can make a half serve in a loaf tin that will give you six generous slices – just halve the ingredients. The full recipe will fit nicely in a 24 x 20 cm square tin.

20200503_115853

Ingredients (full recipe):

200g butter or dairy free spread like Nuttelex
200g Lindt dark chocolate (70% or 80%) (broken up into pieces – break each square into four pieces)
zest of 2 oranges (pick the orangiest colour ones you can find – the deeper the colour, the better the zest)
4 large eggs
300g caster sugar
100g plain flour
50g cocoa powder
Pinch of salt
100g Lindt dark chocolate orange intense (chopped into small pieces)

Method:

  1. Heat the oven to 180 deg C or 175 deg C if fan assisted.
  2. In a smallish saucepan melt the butter, 70 or 80% dark chocolate and orange zest – keep an eye on it, stirring occasionally, only heat it gently. Once melted, take it off the heat to cool.
  3. Whisk the eggs and sugar until the colour goes really pale and they increase in volume. I whisked mine for 3 minutes with an electric whisk.
  4. Stir the melted chocolate mixture into the whisked eggs, make sure it has cooled enough otherwise it will scramble the eggs.
  5. Now sift the flour, cocoa and salt into the mixture and fold it in with a metal spoon.
  6. Stir in the broken chocolate orange intense pieces.
  7. The mixture might look lumpy and rough, but don’t worry – it will be delicious.
  8. Pour into a lined tin approx 24 x 20 cm. Tap the tin on the worktop to make sure that the mixture is down into the corners and then pop it in the oven on the lower shelf.
  9. The full size will take approx 40 minutes to cook and a half serve will take approx 30 minutes to cook but it depends on the efficiency of your oven.
  10. When you insert a skewer, it will be slightly gooey in the centre, but as long as it is not too liquid – that’s fine. The top should be crispy like a brownie.
  11. Cool on a rack and serve.
  12. You can add ice cream, sorbet, fresh orange slices, crushed nuts, candied orange, or dust with a little icing sugar. The brownie is good on it’s own too.

20200503_115605